Hyundai Sonata LF: Rear Suspension System / Rear Lower Arm Repair procedures
| 1. |
Raise the vehicle, and make sure it is securely supported. |
| 2. |
Remove the wheel cap (A). 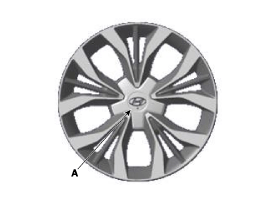
|
Be careful not to damage to the wheel cap (A) when removing the it.
|
|
| 3. |
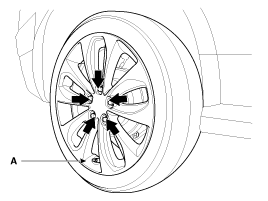
Remove the front wheel and tire (A) from front hub.
Tightening torque:
88.3 ~ 107.9 N.m (9.0 ~ 11.0 kgf.m, 65.1 ~ 79.6 lb-ft)
|
|
Be careful not to damage to the hub bolts when removing the front wheel and tire (A). |
|
| 4. |
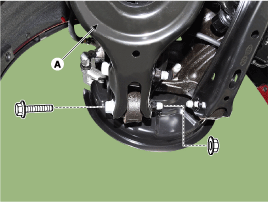
Remove the rear lower arm protector. 
|
| 5. |
Loosen the lower arm (A) mounting bolt and nut. And then remove the lower arm form the rear carrier.
Tightening torque :
137.3 ~ 156.9 N.m (14.0 ~ 16.0 kgf.m, 101.3 ~ 115.7 lb-ft)
|
| • |
Set up the transmission jack under the lower arm in order to remove the shock absorber in no-load condition . |
| • |
Record the position of the alignment marks before removing
the rear lower arm to keep from tightening the bolt and washer to the
wrong position or the wrong direction. |
|
|
| 6. |
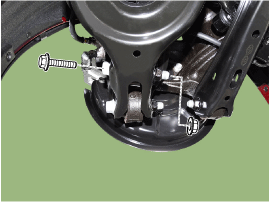
Loosen the mounting bolt and nut. And then separate the shock absorber from the lower arm.
Tightening torque :
137.3 ~ 156.9 N.m (14.0 ~ 16.0 kgf.m, 101.3 ~ 115.7 lb-ft)
|
| • |
Set up the transmission jack under the lower arm in order to remove the shock absorber in no-load condition . |
| • |
Record the position of the alignment marks before removing
the rear lower arm to keep from tightening the bolt and washer to the
wrong position or the wrong direction. |
|
|
| 7. |
Loosen the bolt & nut and then remove the rear lower arm (A) from the sub frame.
Tightening torque :
107.9 ~ 117.7 N.m (11.0 ~ 12.0 Kgf.m, 79.6 ~ 86.8 lb-ft)
|
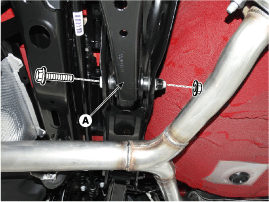
| • |
Set up the transmission jack under the lower arm in order to remove the shock absorber in no-load condition . |
| • |
Record the position of the alignment marks before removing
the rear lower arm to keep from tightening the bolt and washer to the
wrong position or the wrong direction.
|
|
|
| 8. |
Loosen the bolt & nut and then remove the rear lower arm (A) from the sub frame.
Tightening torque :
107.9 ~ 117.7 N.m (11.0 ~ 12.0 Kgf.m, 79.6 ~ 86.8 lb-ft)
|
|
| 1. |
Installation is the reverse of removal.
| • |
Install the component with the specified torques. |
| • |
When installing the bolt, install the lower arm in no-load condition by using the transmission jack. |
|
|
| 2. |
Check the alignment.
(Refer to Tires/Wheels - "Alignment")
|
| 1. |
Check the bushing for wear and deterioration. |
| 2. |
Check the rear lower arm for deformation. |
| 3. |
Check for all bolts and nut. |
| 4. |
Check the cracks or the cutting of the lower . |
Replacement
1.
Raise the vehicle, and make sure it is securely supported.
2.
Remove the wheel cap (A).
Be careful not to damage to the wheel cap (A) when removing the it...
Replacement
1.
Raise the vehicle, and make sure it is securely supported.
2.
Remove the wheel cap (A).
Be careful not to damage to the wheel cap (A) when removing the it...
Other information:
Replacement
1.
Completely open the movable glass using the panorama sunroof switch.
2.
Remove both sides of the decoration cover (A).
3.
Completely close the movable glass using the panorama sunroof switch.
4.
Adjust the height of the glass by slighty loosening the screws (A)...
Removal and Installation
1.
Remove the drive belt.
(Refer to Timing System - "Dreve Belt")
2.
Remove the engineroom under cover.
3.
Remove the passenger side front tire.
4.
Remove the crankshaft damper pulley (A).
Tightening torque :
(47...

 Rear Upper Arm Repair procedures
 Rear Assist Arm Repair procedures