Hyundai Sonata LF: Dual Clutch Transmission Control System / Gear Actuator Assembly Repair procedures

Hyundai Sonata LF 2014-2019 Service Manual / DCT (Dual Clutch Transmission) System / Dual Clutch Transmission Control System / Gear Actuator Assembly Repair procedures

Removal
   
•
When gear actuator removing, set control shaft lever to neutral position.
1.
Remove the air cleaner assembly and air duct.
(Refer to Engine Mechnical System - "Air cleaner")
2.
Remove the battery and tray.
(Refer to Engine Electrical System - "Battery")
3.
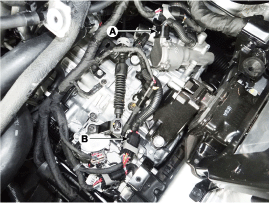
Disconnect the gear actuator motor connector (A) and solenoid connector (B).

4.
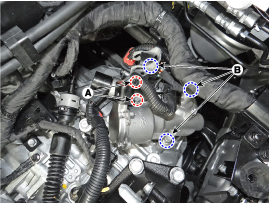
Remove the gear actuator from the transmission after loosening the bolts (A-2ea, B-3ea).

Tightening torque :
(A) : 9.8 ~ 11.8 N.m (1.0 ~ 1.2 kgf.m, 7.2 ~ 8.7 lb-ft)
(B) : 19.6 ~ 26.5 N.m (2.0 ~ 2.7 kgf.m, 14.5 ~ 19.5 lb-ft)

Installation
1.
Install in the reverse order of removal.
   
•
Check the details below before installing the gear actuator assembly.
1.
Check that the gear actuator is placed in the "neutral" state.
2.
Check the assembled state of the O-rings (A).

3.
Apply gear oil to the surface of O- rings.
4.
Check the assembled state of the dowel pins (A).

•
Perform the clutch touch point learning procedure using the GDS after replacing the gear actuator assembly.

    Gear Actuator Assembly Schematic Diagrams

    C..

    Input shaft speed sensor 1 Components and Components Location

    C..

    Other information:

    Hyundai Sonata LF 2014-2019 Service Manual: Starter Description and Operation


    Description The starting system includes the battery, starter, solenoid switch, ignition switch, inhibitor switch (A/T), clutch pedal switch (M/T), ignition lock switch, connection wires and the battery cable. When the ignition key is turned to the start position, current flows and energizes the starter motor's solenoid coil...

    Hyundai Sonata LF 2014-2019 Service Manual: Ignition Switch Assembly. Repair procedures


    Repair procedures Replacement 1. Disconnect the negative (-) battery terminal. 2. Remove the crash pad lower panel. (Refer to Body - "Crash Pad") 3. Remove the steering column upper & Lower shroud. 4. Remove the ignition switch (A) and disconnecting the Key Warning / immobilizer connector...

    Categories

    read more

     
    Copyright © 2026 www.hsonatalf.org