Hyundai Sonata: Seat Electrical / Air Ventilation Seat Repair procedures
Hyundai Sonata LF 2014-2019 Service Manual / Body Electrical System / Seat Electrical / Air Ventilation Seat Repair procedures
| Removal |
[Ventilation Blower]
| 1. |
Disconnect the negative (-) battery terminal. |
| 2. |
Remove the front seat.
(Refer to Body - "Front Seat Assembly") |
| 3. |
Remove the under cover assembly.
(Refer to Body - "Front Seat Cushion Cover")
|
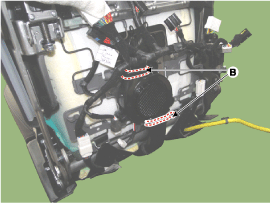
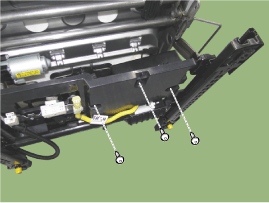
| 4. |
Remove the blower fan (A) after removing the fixed clip (B) and screws.
|
| 5. |
Remove the front seat back board.
(Refer to Body - "Front Seat Back Cover") |
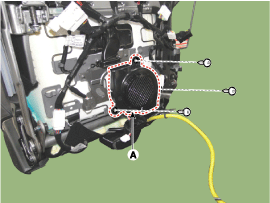
| 6. |
Remove the duct (A) after remove the screws.
|
[Ventilation Seat Unit]
| 1. |
Disconnect the negative (-) battery terminal. |
| 2. |
Remove the front seat.
(Refer to Body - "Front seat Assembly") |
| 3. |
Loosening the screws from the ventilation seat unit.
|
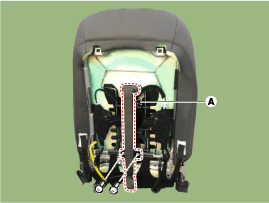
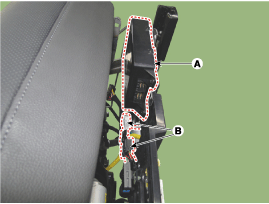
| 4. |
Remove the ventilation seat unit (A) after disconnect the connectors (B).
|
| Installation |
[Ventilation Blower]
| 1. |
Install the duct. |
| 2. |
Install the front seat back board. |
| 3. |
Install the blower fan. |
| 4. |
Install the front seat assembly. |
| 5. |
Connect the negative (-) battery terminal. |
[Ventilation Seat Unit]
| 1. |
Install the ventilation seat unit. |
| 2. |
Install the front seat assembly. |
| 3. |
Connect the negative (-) battery terminal. |
| Inspection |
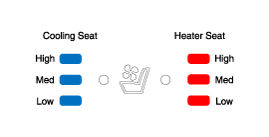
Ventilating seat consists of three units: the ventilating seat unit for control, switch for input and and blower for output.
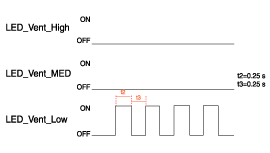
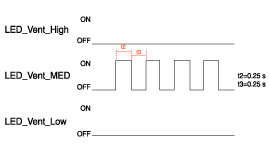
Diagnosis Mode
| 1. |
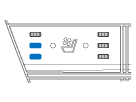
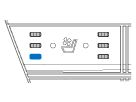
You can enter the diagnosis mode by turning the ventilation seat button on. |
| 2. |
You can enter the diagnosis mode by referring to the timing chart and description below.
|
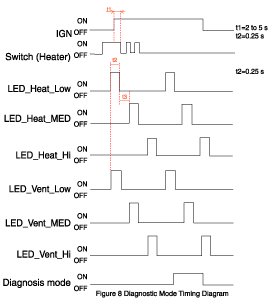
| 3. |
After entering the diagnosis mode, you can check what failed by checking the blinking LED.
|
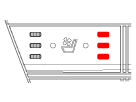
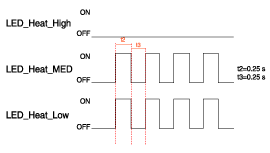
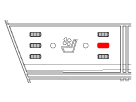
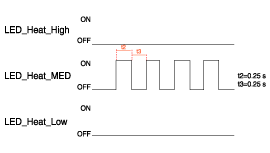
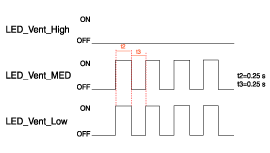

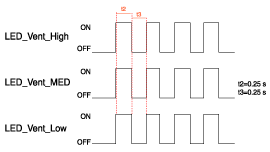
| 4. |
You can check the malfunctioning by checking the blinking LED. |
| 5. |
The ventilating seat unit will record the malfunctioning that occurred. |
| 6. |
If you press the heating seat button for more than five
seconds, the LED for malfunctioning memory will blink four times and the
recorded memory will be deleted. |
| 7. |
Pressing the IGN OFF button will end the diagnosis mode for the ventilating seat. |
| 8. |
You can check wheter the ventilating seat system works
properly after turning the IGN ON. If you want to check the error code,
you can refer to the procedure of 2 above. |
 Air Ventilation Seat Schematic Diagrams
Circuit Diagram
...
 Lumber Support Units Components and Components Location
Component Location
[Mechanical Lumbar Support Assembly]
...
Other information:
Hyundai Sonata LF 2014-2019 Service Manual: Repair procedures
Inspection
1.
After disconnecting the vapor hose from the PCV valve, remove the PCV valve.
2.
Reconnect the PCV valve to the vapor hose.
3.
Inspect the PCV vlave operation.
(1)
Run the engine at idle.
(2)
Put a finger on the open end of the PCV valve.
(3)
Make sure that intake ...
Hyundai Sonata LF 2014-2019 Owners Manual: Applying the parking brake
To apply the EPB (Electronic Parking Brake):
1. Depress the brake pedal.
2. Pull the EPB switch upwards.
Make sure the Parking Brake Warning Light comes on.
The EPB is applied automatically if the [AUTO HOLD] switch is on when the engine
is turned off. However, if you press the EPB switch within o ...
© 2018-2025 www.hsonatalf.org
