
Hyundai Sonata LF: Intake And Exhaust System / Muffler Components and Components Location
| Components |
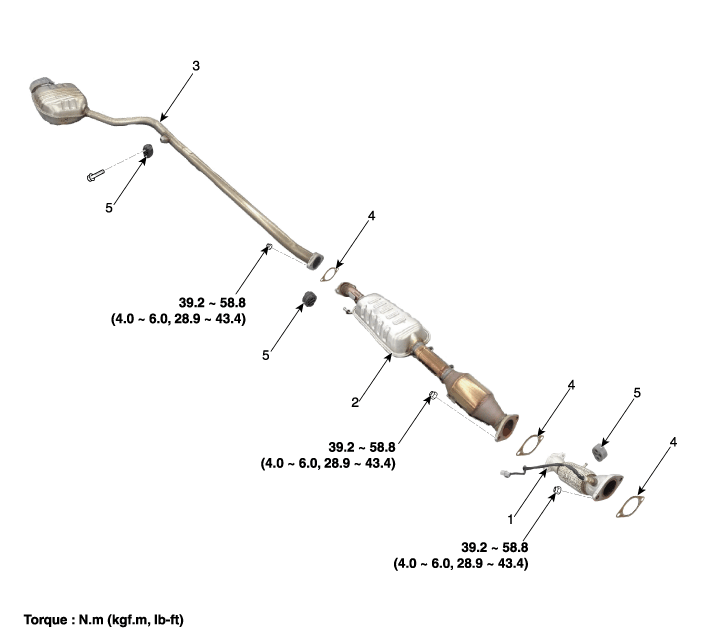
| 1. Front muffler 2. Center muffler 3. Main muffler | 4. Gas ket 5. Hanger |
 Turbo Charger Repair procedures
On-vehicle Inspection Turbocharger Diagnostic Flow If any problem related with turbocharger, such as lack of engine power, poor acceleration, abnormal engine noise or oil leaks, may occur, check the turbocharger according to the procedure as follows...
 Muffler Repair procedures
Removal and Installation Front Muffler 1. Disconnect the battery negative terminal. 2. Disconnect the rear oxygen sensor connector (A). 3...
Other information:
Hyundai Sonata LF 2014-2019 Service Manual: Manifold Absolute Pressure Sensor (MAPS) Repair procedures
Inspection 1. Connect the GDS on the Data Link Connector (DLC). 2. Measure the output voltage of the MAPS at idle and IG ON. Specification: Refer to "Specification" Removal 1. Turn the ignition switch OFF and disconnect the battery negative (-) cable...
Hyundai Sonata LF 2014-2019 Service Manual: Sub Frame Repair procedures
Replacement 1. Raise the vehicle, and make sure it is securely supported. 2. Remove the wheel cap (A). Be careful not to damage to the wheel cap (A) when removing the it. 3. Remove the front wheel and tire (A) from front hub...
Categories
- Manuals Home
- Hyundai Sonata Owners Manual
- Hyundai Sonata Service Manual
- DCT (Dual Clutch Transmission) System
- General Information
- Suspension System
- New on site
- Most important about car
