Hyundai Sonata LF: Heater / Heater Core Repair procedures
| 1. |
Disconnect the negative (-) battery terminal. |
| 2. |
After loosening the bolts remove the main crash pad and cowl cross bar assembly together.
(Refer to Heater -"Heater Unit") |
| 3. |
Remove the heater core cover (A) after loosening the mounting screws. 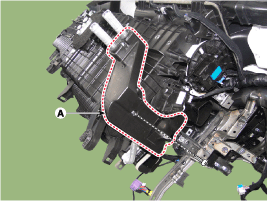
|
| 4. |
Pull out the heater core (A) from the heater unit. 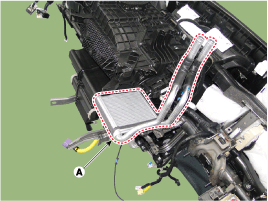
|
| 5. |
Install in the reverse order of removal.
| A. |
If you're installing a new heater core, add refrigerant oil (PAG OIL). |
| B. |
Replace the O-rings with new ones at each fitting, and apply a
thin coat of refrigerant oil before installing them. Be sure to use the
right O-rings for R-134a to avoid leakage. |
| C. |
Immediately after using the oil, replace the cap on the container, and seal it to avoid moisture absorption. |
| D. |
Do not spill the refrigerant oil on the vehicle; it may
damage the paint; if the refrigerant oil contacts the paint, wash it off
immediately. |
| E. |
Apply sealant to the grommets. |
| F. |
Make sure that there is no air leakage. |
| G. |
Charge the system and test its performance. |
| H. |
Do not interchange the inlet and outlet heater hoses and install the hose clamps securely. |
|
Replacement
When prying with a flat-tip screwdriver or use a prying trim
tool, wrap it with protective tape, and apply protective tape around the
related parts, to prevent damage...
Replacement
1.
Disconnect the negative (-) battery terminal.
2.
After loosening the bolts remove the main crash pad and cowl cross bar assembly together...
Other information:
Removal
1.
Disconnect the battery (-) terminals.
2.
Remove the floor console assembly.
(Refer to Body - "Floor Console Assembly")
3.
Remove the multimedia jack (A) after disconnect the connector and loosening the mounting screws.
Installation
1...
Removal and Installation
1.
Remove the drive belt.
(Refer to Timing System - "Dreve Belt")
2.
Remove the alternator.
(Refer to Engine Electrical System - "Alternator")
3.
Remove the alternator bracket (belt tunsioner) (A).
Tightening torque :
19...

 Heater Unit Repair procedures
 Evaporator Core Repair procedures