Hyundai Sonata LF: Interior Trim / Rear Pillar Trim Repair procedures
Hyundai Sonata LF 2014-2019 Service Manual / Body (Interior and Exterior) / Interior Trim / Rear Pillar Trim Repair procedures
| Replacement |
|

|

| 1. |
Slighty remove the rear door body side weatherstrip. |
| 2. |
Using a screwdriver or remover, remove the rear pillar tirm (A).
|
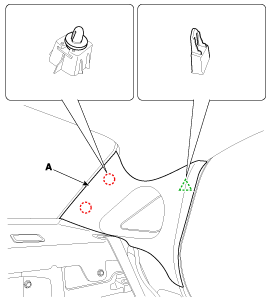
| 3. |
Install in the reverse order of removal.
|


Other information:
Hyundai Sonata LF 2014-2019 Service Manual: General Safety Information and Caution
Instructions When Handling Refrigerant 1. R-134a liquid refrigerant is highly volatile. A drop on the skin of your hand could result in localized frostbite. When handling the refrigerant, be sure to wear gloves. 2. It is standard practice to wear goggles or glasses to protect your eyes, and gloves to protect your hands...
Hyundai Sonata LF 2014-2019 Service Manual: Evaporator Temperature Sensor Description and Operation
Description The evaporator temperature sensor will detect the evaporator core temperature and interrupt compressor relay power in order to prevent evaporator from freezing by excessive cooling. The evaporator temperature sensor has the Negative Temperature Coefficient (NTC)...
Categories
- Manuals Home
- Hyundai Sonata Owners Manual
- Hyundai Sonata Service Manual
- Cooling System
- General Information
- Transmission Gear Oil Repair procedures
- New on site
- Most important about car

Copyright © 2026 www.hsonatalf.org