Hyundai Sonata LF: Lighting System / Head Lamps Repair procedures
| Inspection |
| 1. |
Check the battery voltage. (Low beam will be on when the battery voltage above 9V.) |
| 2. |
Check the fuse and relay. |
| 3. |
Check the polarity of ballast. (If the polarity are changed, low beam doesn't lighten) |
| 4. |
Check the bulb connector securely. |
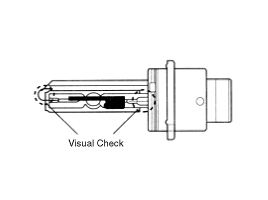
| 5. |
Visually bulb checking (no filament) : damaged glass, damaged for upper parts and lower parts of glass tube. |
| 6. |
After (1)~(5), replace the ballast and the ignitor. (ballast assembly).
|
| 1. |
Durable for vibration as there is no filament. |
| 2. |
HID lamp had a more long life than halogen lamp. |
| 3. |
Does not operate if polarity is changed. |
| 4. |
Operating input voltage : 9-16V |
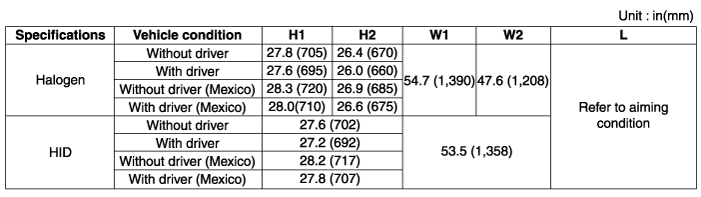
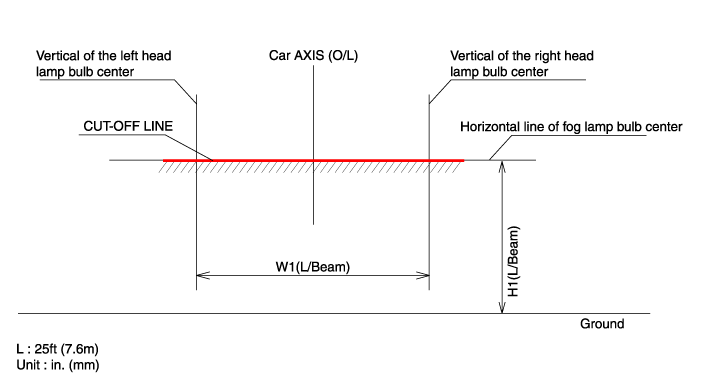
| Head Lamp Aiming Instructions |
| [Mechanical Aiming] |
If there are any regulations pertinent to the aiming of head
lamps in the area where the vehicle is to be used, adjust so as to meet
those requirements. |

| 1. |
Inflate the tires to the specified pressure and remove any loads from the vehicle except the driver, spare tire, and tools. |
| 2. |
The vehicle should be placed on a flat floor. |
| 3. |
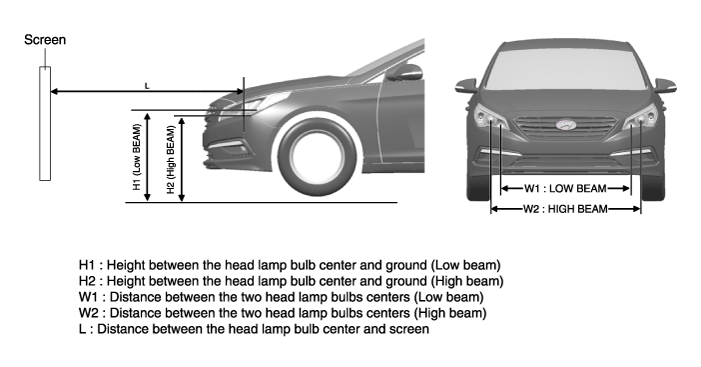
Draw vertical lines (Vertical lines passing through
respective head lamp centers) and a horizontal line (Horizontal line
passing through center of head lamps) on the screen. |
| 4. |
With the head lamp and battery in normal condition, aim the head lamps so the brightest portion falls on the vertical lines.
A : Vertical
|
| 1. |
Head Lamp (Low beam)
|
| Removal |
| 1. |
Disconnect the negative (-) battery terminal. |
| 2. |
Remove the front bumper cover.
(Refer to Body - "Front Bumper Cover") |
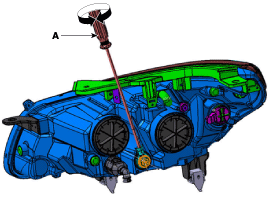
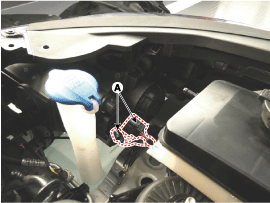
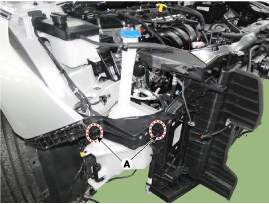
| 3. |
Disconnect the head lamp connector (A).
|
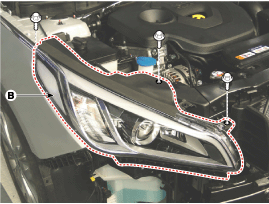
| 4. |
Remove the head lamp (B) mounting bolts.
|
| 5. |
Remove the bulb caps from the head lamp assembly afterturning in the counter clock-wise direction.
|
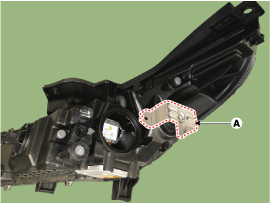
| 6. |
Remove the Bracket (A) after loosening the mounting screws.
[HID Type]
|
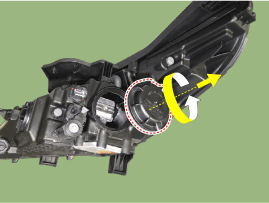
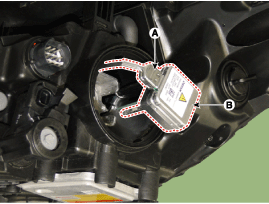
| 7. |
Disconnect the ignitor connector (A). |
| 8. |
Remove the ignitor lamp (B).
|
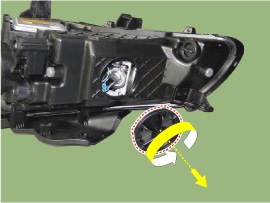
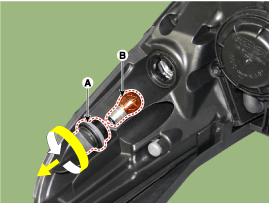
| 9. |
Remove the turn signal socket (A). |
| 10. |
Remove the turn signal lamp (B).
|
| Installation |
| 1. |
Install the head lamp assembly after connecting the connector. |
| 2. |
Install the front bumper corver. |
| 3. |
Connect the negative (-) battery terminal. |
| Replacement |
| 1. |
Turn the head lamp switch off. |
| 2. |
Remove the lamp assembly. |
| 3. |
Disconnect the power connector from the lamp. |
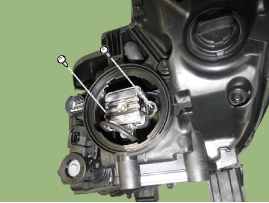
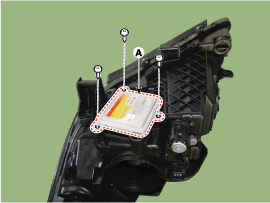
| 4. |
Remove the ballast (A) after loosening the screws.
|
| 5. |
Installation is the reverse of removal.
|

 Head Lamps Description and Operation
HID Head Lamp 1. Bulb (1) Elements Xenon gas : Xenon gas activates the initial reaction for rapid illuminating. Molybdenum electrode: anode arcing Metal halide salts: color composing component (2) Lightening principle When Xenon gas and metal halide salt will discharge the molybdenum anode in a capsule, it emits light...
 Room Lamp Repair procedures
Removal Room Lamp (Non-Panorama Sunroof) 1. Disconnect the negative (-) battery terminal. 2. Using a screwdriver or remover, Separate the room lamp lens (A) from the room lamp...
Other information:
Hyundai Sonata LF 2014-2019 Service Manual: Speaker Repair procedures
Inspection 1. Troubleshooting for Speaker (1) Basic inspection of speaker Inspect the sound from speaker after verifying that the speaker mounting screws is removed and the wiring connector is connected precisely to remove vibration transmitted from body trims and surrounding parts...
Hyundai Sonata LF 2014-2019 Service Manual: Description and Operation
Description The cruise control system is engaged by the cruise "ON/OFF" main switch located on right of steering wheel column. The system has the capability to cruise, coast, accelerate and resume speed. It also has a safety interrupt, engaged upon depressing brake or shifting select lever...
Categories
- Manuals Home
- Hyundai Sonata Owners Manual
- Hyundai Sonata Service Manual
- Body (Interior and Exterior)
- Emission Control System
- Transmission Gear Oil Repair procedures
- New on site
- Most important about car
