Hyundai Sonata LF: Fuel Delivery System / Fuel Pump Control Module (FPCM) Repair procedures
Hyundai Sonata LF 2014-2019 Service Manual / Engine Control / Fuel System / Fuel Delivery System / Fuel Pump Control Module (FPCM) Repair procedures
| Removal |
| 1. |
Turn the ignition switch OFF and disconnect the battery negative (-) cable. |
| 2. |
emove the rear seat cushion.
( Refer to Body - "Rear Seat Assembly") |
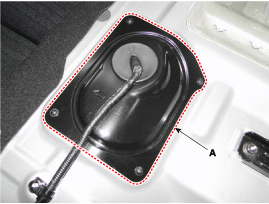
| 3. |
Remove the fuel pump service cover (A).
|
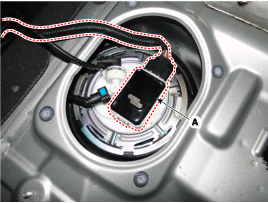
| 4. |
Disconnect the fuel pump control module connector (A). |
| 5. |
Remove the fuel pressure control module (A) after removing the screws.
|
| Installation |
| 1. |
Install in the reverse order of removal.
|
| Inspection |
| 1. |
Connect the GDS to the vehicle's data link connector (DLC). |
| 2. |
Check any DTCs and if exist, repair according to the DTC guide. |
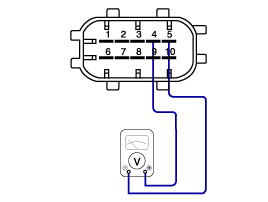
| 3. |
Check the power supply voltage provided to the fuel pressure sensor (FPS).
|
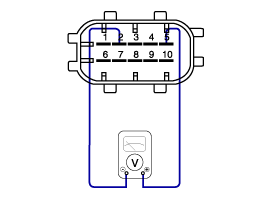
| 4. |
Check the voltage provided to the fuel pressure sensor (FPS) at idle.
|
| 5. |
Check the fuel pressure in the low fuel line.
(Refer to Fuel Delivery System - "Fuel Pressure Test")
|

 Fuel Pressure Sensor (FPS) Description and Operation
Description The fuel pressure sensor (FPS) is installed on the top of the low pressure fuel pump and measures the pressure in the low pressure fuel line...
Other information:
Hyundai Sonata LF 2014-2019 Service Manual: Alternator Components and Components Location
C..
Hyundai Sonata LF 2014-2019 Service Manual: Rear Door Outside Handle Repair procedures
Replacement 1. Remove the hole plug (B). 2. After loosening the mounting bolt, then remove the rear door outside handle cover (A). Tightening torque : 6.9 ~ 10.8 N.m (0.7 ~ 1.1 kgf.m, 5.1 ~ 8.0 lb-ft) 3. Remove the rear door outside handle (A) by sliding it rearward...
Categories
- Manuals Home
- Hyundai Sonata Owners Manual
- Hyundai Sonata Service Manual
- Engine Control System
- Transmission Gear Oil Repair procedures
- Engine Electrical System
- New on site
- Most important about car

Copyright © 2026 www.hsonatalf.org