Hyundai Sonata LF: Engine Control System / Engine Coolant Temperature Sensor (ECTS) Repair procedures
| 1. |
Turn the ignition switch OFF. |
| 2. |
Remove the ECTS (Refer to "Removal"). |
| 3. |
After immersing the thermistor of the sensor into engine coolant, measure resistance between the ECTS terminals 3 and 4. |
| 4. |
Check that the resistance is within the specification.
Specification: Refer to “Specification�
|
|
| 1. |
Turn the ignition switch OFF and disconnect the battery negative (-) terminal. |
| 2. |
Remove the air cleaner assembly and air intake hose.
(Refer to Engine Mechanical System - “Air Cleaner�) |
| 3. |
Remove the engine wiring.
| (1) |
Disconnect the OCV and WGV extension (A). 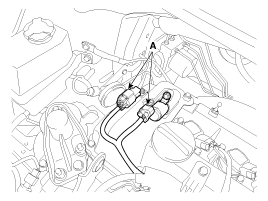
|
| (2) |
Disconnect the ignition coil (A). |
| (3) |
Disconnect the CMPS (B). |
| (4) |
Disconnect the FPCV (C). |
| (5) |
Disconnect the PCSV (D). |
| (6) |
Remove the enigne wiring mounting bolts (E) and then remove the engine wiring harness (F). 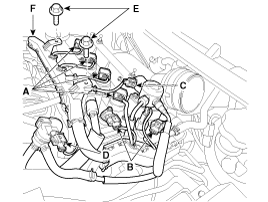
|
|
| 4. |
Remove the vacuum pipe mounting bolts (A) and make a gap by moving the bracket. |
| 5. |
Disconnect the engine coolant temperature sensor connector (B). |
| 6. |
Remove the engine coolant temperature sensor (C). 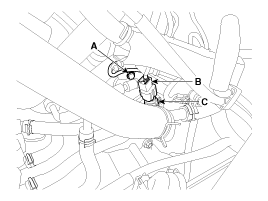
| • |
Note that engine coolant may be flowed out from the water temperature control assembly when removing the sensor. |
|
|
| 7. |
Fill with engine coolant.
(Refer to Engine Mechanical System - "Coolant")
|
| • |
Install the component with the specified torques. |
| • |
Note that internal damage may occur when the component is dropped. If the component has been dropped, inspect before installing. |
|
| • |
Apply the engine coolant to the O-ring. |
|
| • |
Insert the sensor in the installation hole and be careful not to damage.
|
|
| 1. |
Install in the reverse order of removal.
Engine Coolant Temperature Sensor installation :
29.4 ~ 39.2 N.m (3.0 ~ 4.0 kgf.m, 21.7 ~ 28.9 lb-ft)
|
|
Description
Crankshaft Position Sensor (CKPS) detects the crankshaft
position and is one of the most important sensors of the engine control
system...
Other information:
C..
Replacement
•
Put on gloves to protect your hands.
•
When prying with a flat-tip screwdriver or use a prying trim
tool, wrap it with protective tape, and apply protective tape around the
related parts, to prevent damage...



 Crankshaft Position Sensor (CKPS) Description and Operation