
Hyundai Sonata LF: Brake System / Brake Pedal Repair procedures
Hyundai Sonata LF 2014-2019 Service Manual / Brake System / Brake System / Brake Pedal Repair procedures
| Removal |
| 1. |
Turn ignition switch OFF and disconnect the negative (-) battery cable. |
| 2. |
Remove the crash pad lower panel.
(Refer to Body - "Crash Pad") |
| 3. |
Remove the knee air bag.
(Refer to Restraint - "Knee Airbag(KAB) Module") |
| 4. |
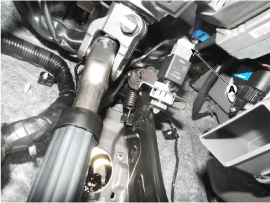
Disconnect the stop lamp switch connector (A), and than remove stop lamp switch.
|
| 5. |
Pull down steering column shaft after removing bolts and nuts
(Refer to - "Steering System - "Steering Column and Shaft") |
| 6. |
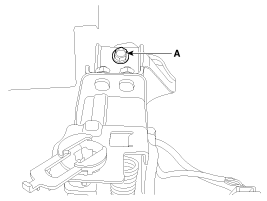
Remove the brake pedal member mounting nut (A).
|
| 7. |
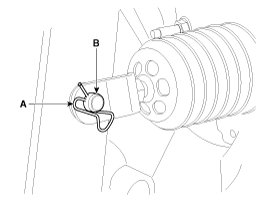
Remove the snap pin (A) and clevis pin (B).
|
| 8. |
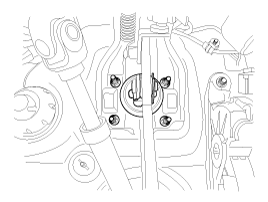
Remove the brake pedal member assembly mounting nuts and then remove the brake pedal assembly.
|
| Inspection |
| 1. |
Check the bushing for wear. |
| 2. |
Check the brake pedal for bending or twisting. |
| 3. |
Check the brake pedal return spring for damage. |
| Installation |
| 1. |
Installation is the reverse of removal.
|

| 2. |
Adjust the brake pedal height and free play. |
| 3. |
Check the brake pedal operation. |


Other information:
Hyundai Sonata LF 2014-2019 Service Manual: Heater & A/C Control Unit (DATC) Components and Components Location
C..
Hyundai Sonata LF 2014-2019 Service Manual: Repair procedures
Operation and Leakage Check Check all of the following items: ComponentProcedureBrake Booster (A)Check brake operation by applying the brakes during a test drive. If the brakes do not work properly, check the brake booster. Replace the brake booster as an assembly if it does not work properly or if there are signs of leakage...
Categories
- Manuals Home
- Hyundai Sonata Owners Manual
- Hyundai Sonata Service Manual
- Body Electrical System
- Brake System
- Suspension System
- New on site
- Most important about car

Copyright © 2026 www.hsonatalf.org