Hyundai Sonata LF: Timing System / Timing Chain Cover Repair procedures
Hyundai Sonata LF 2014-2019 Service Manual / Engine Mechanical System / Timing System / Timing Chain Cover Repair procedures
| Removal |
|

Mark all wiring and hoses to avoid misconnection. |

In case of removing the high pressure fuel pump, high
pressure fuel pipe, delivery pipe, and injector, there may be injury
caused by leakage of the high pressure fuel. So don’t do any repair
work right after engine stops.
|

| 1. |
Remove the drive belt.
(Refer to Timing System - "Drive Belt") |
| 2. |
Remove the drive belt idler.
(Refer to Timing System - "Idler") |
| 3. |
Remove the alternetor.
(Refer to Engine Electrical System - "Alternator") |
| 4. |
Remove the alternetor bracket.
(Refer to Engine Electrical System - "Alternator") |
| 5. |
Remove the engineroom under cover. |
| 6. |
Remove the crankshaft damper pulley.
(Refer to Timing System - Crankshaft Damper Pulley") |
| 7. |
Remove the water pump.
(Refer to Cooling System - "Water Pump") |
| 8. |
Remove the air cleaner assembly.
(Intake and Exhaust System - "Air Cleaner") |
| 9. |
Remove the high pressure fuel pump.
(Refer to Fuel System - "High Pressure Fuel Pump") |
| 10. |
Remove the cylinder head cover.
(Refer to Cylinder Head Assembly - "Cylinder Head Cover") |
| 11. |
Remove the engine mounting support bracket.
(Refer to Engine And Transaxle Assembly - "Engine Mounting") |
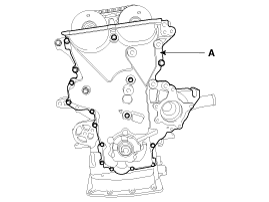
| 12. |
Remove the timing chain cover (A).
|
| Installation |
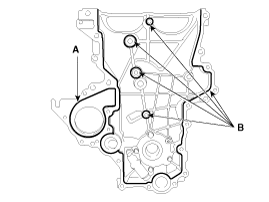
| 1. |
Install the timing chain cover.
|
| 2. |
Install in the reverse order of removal. |


Other information:
Hyundai Sonata LF 2014-2019 Service Manual: Components and Components Location
C..
Hyundai Sonata LF 2014-2019 Service Manual: Water pump Repair procedures
Removal 1. Loosen the drain plug (A), and drain the engine coolant. Remove the radiator cap to drain with speed. System is under high pressure when the engine is hot.To avoid danger of releasing scalding engine coolant, remove the cap only when the engine is cool...
Categories
- Manuals Home
- Hyundai Sonata Owners Manual
- Hyundai Sonata Service Manual
- Transmission Gear Oil General Information
- Brake System
- Suspension System
- New on site
- Most important about car

Copyright © 2026 www.hsonatalf.org