Hyundai Sonata: Electric Power Steering / Steering Column and Shaft Repair procedures
Hyundai Sonata LF 2014-2019 Service Manual / Steering System / Electric Power Steering / Steering Column and Shaft Repair procedures
| Removal |
| [For C-MDPS Type] |
Must be backup the ECU data before exchanging the ECU. The backup data is stored by the VIN number.
Before exchanging the MDPS motor, must be confirm the last two digit of the constant value in motor barcord. |

| 1. |
Disconnect the battery negative cable from the battery and then wait for at least 30 seconds. |
| 2. |
Turn the steering wheel so that the front wheels can face straight ahead. |
| 3. |
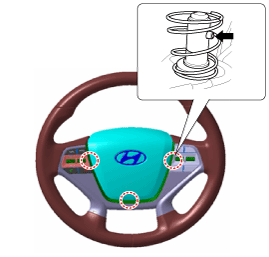
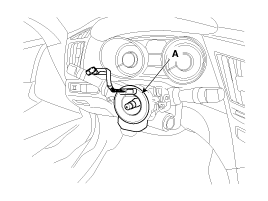
Remove the airbag module.
|
| 4. |
Remove the DAB module.
|
| 5. |
Loosen the steering wheel lock bolt properly.
Separate the steering wheel by using SST(09561-11001). |
| 6. |
Loosen the steering wheel lock bolt completely, remove the steering wheel. |
| 7. |
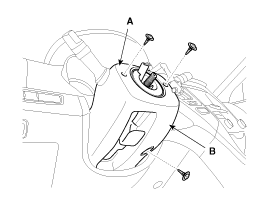
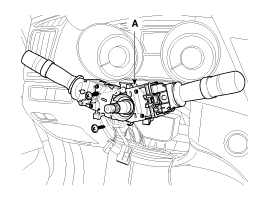
Remove the steering column shroud (A) & (B).
|
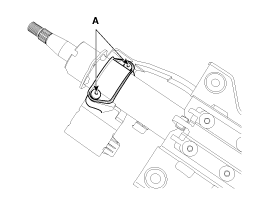
| 8. |
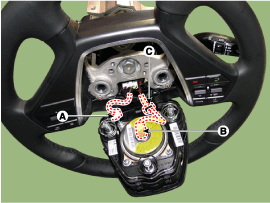
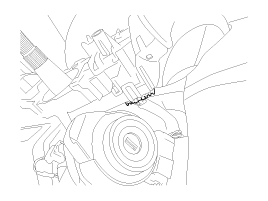
Disconnect the connector and then remove the clock spring (A).
| ||||||||||
| 9. |
Disconnect the multifunction switch connector.
|
| 10. |
Loosen the screw and then remove the multifunction switches (A).
|
| 11. |
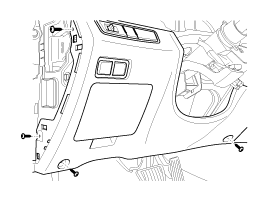
Remove the crash pad lower cover,
|
| 12. |
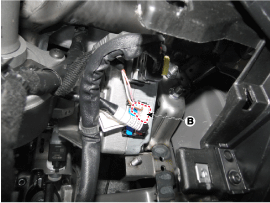
Loosen the knee aig bag mounting nut (A) and then disconnect the connector (B).
|
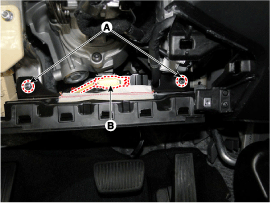
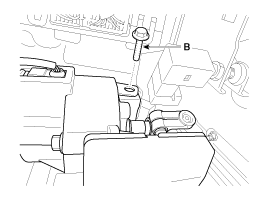
| 13. |
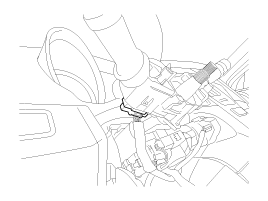
Disconnect the ECU connector (A) & (B).
|

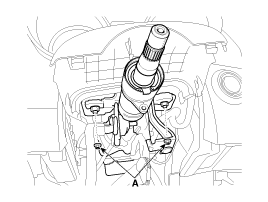
| 14. |
Disconnect the connected wiring at the steering column assembly. |
| 15. |
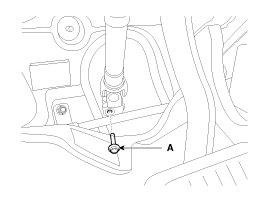
Loosen the universal joint bolt(A) and then disconnect the universal joint assembly.
|
| 16. |
Remove the steering column & EPS unit assembly by loosening the mounting bolt (B) and nuts (A).
|
| 17. |
Installation is the reverse of the removal.
|
| [For R-MDPS Type] |
| 1. |
Disconnect the battery negative cable from the battery and then wait for at least 30 seconds. |
| 2. |
Turn the steering wheel so that the front wheels can face straight ahead. |
| 3. |
Remove the airbag module.
|
| 4. |
Remove the DAB module.
|
| 5. |
Loosen the steering wheel lock bolt properly.
Separate the steering wheel by using SST(09561-11001). |
| 6. |
Loosen the steering wheel lock bolt completely, remove the steering wheel. |
| 7. |
Remove the steering column shroud (A) & (B).
|
| 8. |
Disconnect the connector and then remove the clock spring (A).
| ||||||||||
| 9. |
Disconnect the multifunction switch connector.
|
| 10. |
Loosen the screw and then remove the multifunction switches (A).
|
| 11. |
Remove the crash pad lower cover,
|
| 12. |
Loosen the knee aig bag mounting nut (A) and then disconnect the connector (B).
|
| 13. |
Disconnect the connected wiring at the steering column assembly. |
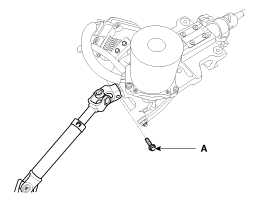
| 14. |
Loosen the universal joint bolt(A) and then disconnect the universal joint assembly.
|
| 15. |
Remove the steering column & EPS unit assembly by loosening the mounting bolt (B) and nuts (A).
|
| Disassembly |
| Key lock assembly |
| 1. |
Make a groove on the head of special bolts (A) by a punch.
|
| 2. |
Loosen the special bolt using a screw driver and then remove the key lock assembly from the steering column assembly. |
| 3. |
Reassembly is the reverse of the disassembly.
|
| Universal joint assembly |
| 1. |
Loosen the bolt (A) and then disconnect the universal joint assembly from the steering column assembly.
|
| 2. |
Reassembly is the reverse of the disassembly.
|
| Installation |
| 1. |
Installation is the reverse of the removal. |
| 2. |
Connect the diagnostic instrument to the self-diagnostic
connector (16-pin) beneath the crash pad on the side of driver's seat,
and then turn on the ignition to activate the diagnostic instrument. |
| 3. |
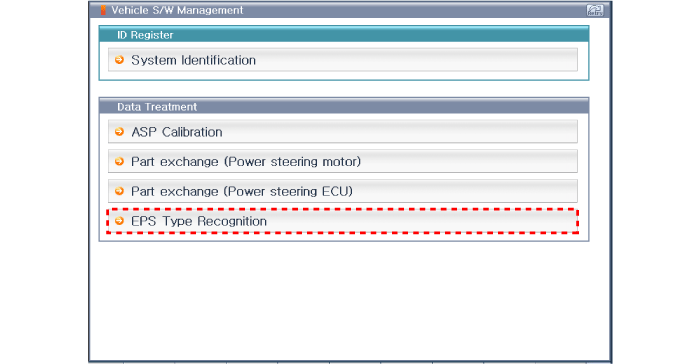
In the GDS Vehicle Type Selection menu, select "Vehicle Type" and "EPS" System, and then opt for "OK." |
| 4. |
Select the ASP Calibration |
| 5. |
Proceed with the test according to the screen introductions.
|
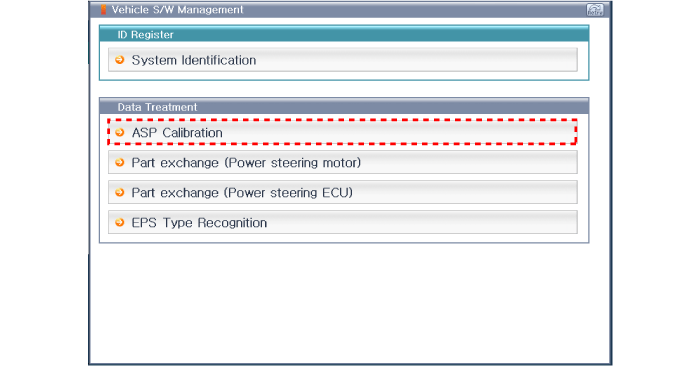
| 6. |
Select "EPS Variant Coding". |
| 7. |
Proceed with the test according to the screen introductions.
|
 Steering Column and Shaft Components and Components Location
Components
[C-MDPS]
1. Steering wheel2. Steering column3. ECU4. Motor5. Steering gear box
[R-MDPS]
1. Steering wheel2. Steering column3. Steering gear box
...
 Steering Gear box Components and Components Location
Components
[C-MDPS]
1. Steering gear box2. Stabilizer bar3. Sub frame4. Bellows5. Tie rod end6. Heat protect
[R-MDPS]
1. Steering gaer box2. Stabilizer bar3. Sub frame4. Bellows5. Tie rod ...
Other information:
Hyundai Sonata LF 2014-2019 Service Manual: Center Facia Upper Panel Repair procedures
Replacement
•
Put on gloves to protect your hands.
•
When prying with a flat-tip screwdriver or use a prying trim
tool, wrap it with protective tape, and apply protective tape around the
related parts, to prevent damage.
•
Us ...
Hyundai Sonata LF 2014-2019 Service Manual: Repair procedures
Adjustment
Glass Adjustment
•
Check the glass run channel for damage or deterioration, and replace them if necessary.
1.
Remove the rear door trim.
(Refer to Rear Door - "Rear Door Trim")
2.
Remove the rear door window glass mounting hole plug (A).
3.
...
© 2018-2025 www.hsonatalf.org
