Hyundai Sonata LF: Seat Electrical / Seat Heater Repair procedures
Hyundai Sonata LF 2014-2019 Service Manual / Body Electrical System / Seat Electrical / Seat Heater Repair procedures
| Inspection |
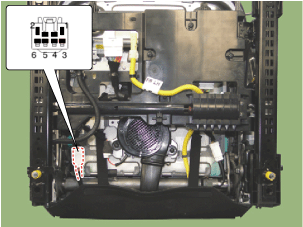
Front Seat Heater
| 1. |
Check for continuity and measure the resistance between terminals No 3 and No 6.
|
| 2. |
Operate the seat heater after connecting the connector, and
then check the thermostat by measuring the temperature of seat surface.
|
Front Seat Heater (Air Ventilation)
| 1. |
Check for continuity and measure the resistance between terminals.
|
| 2. |
Operate the seat heater after connecting the connector, and
then check the thermostat by measuring the temperature of seat surface.
|
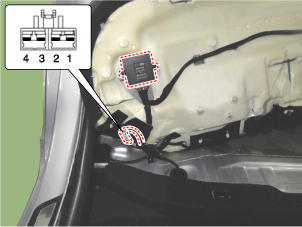
Rear Seat Heater
| 1. |
Check for continuity and measure the resistance between terminals No 1 and No 4.
|
| 2. |
Operate the seat heater after connecting the connector, and
then check the thermostat by measuring the temperature of seat surface.
|


Other information:
Hyundai Sonata LF 2014-2019 Service Manual: Description and Operation
Description The charging system included a battery, an alternator with a built-in regulator, and the charging indicator light and wire. The Alternator has eight built-in diodes, each rectifying AC current to DC current. Therefore, DC current appears at alternator "B" terminal...
Hyundai Sonata LF 2014-2019 Service Manual: General Information
General Information The supplemental restraint system (SRS) is designed to supplement the seat belt to help reduce the risk or severity of injury to the driver and passenger by activating and deploying the driver, passenger, side airbag and belt pretensioner in certain frontal or side collisions...
Categories
- Manuals Home
- Hyundai Sonata Owners Manual
- Hyundai Sonata Service Manual
- Suspension System
- Brake System
- Engine Control / Fuel System
- New on site
- Most important about car

Copyright © 2026 www.hsonatalf.org