Hyundai Sonata LF: SRSCM / Seat Belt Buckle Switch (BS) Repair procedures
Hyundai Sonata LF 2014-2019 Service Manual / Restraint / SRSCM / Seat Belt Buckle Switch (BS) Repair procedures
| Removal |
| 1. |
Disconnect the battery negative cable, and wait for at least three minutes before beginning work. |
| 2. |
Remove the front seat assembly.
(Refer to Body - "Front Seat Assembly") |
| 3. |
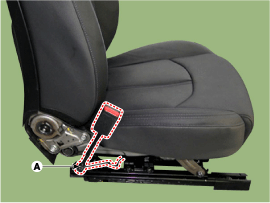
Loosen the seat belt buckle mounting bolt and remove the seat belt buckle switch (A).
|
| Installation |
Be sure to install the harness wires so they will not pinch or interfere with other parts. |

| 1. |
Remove the ignition key from the vehicle. |
| 2. |
Disconnect the battery negative cable, and wait for at least three minutes before beginning work. |
| 3. |
Install the seat belt buckle switch.
|
| 4. |
Install the front seat assembly.
(Refer to Body - "Front Seat Assembly") |
| 5. |
Reconnect the battery negative cable. |
| 6. |
After installing the seat belt buckle switch, confirm proper system operation:
|


Other information:
Hyundai Sonata LF 2014-2019 Service Manual: Audio Remote Control (Sonata Sports) Schematic Diagrams
C..
Hyundai Sonata LF 2014-2019 Service Manual: Smart Key Diagnostic Repair procedures
Inspection Self Diagnosis with Scan Tool It will be able to diagnose defects of SMART KEY system with GDS quickly. GDS can operates actuator forcefully, input/output value monitoring and self diagnosis. The following three features will be major problem in SMART KEY system...
Categories
- Manuals Home
- Hyundai Sonata Owners Manual
- Hyundai Sonata Service Manual
- Emission Control System
- Body Electrical System
- Brake System
- New on site
- Most important about car

Copyright © 2026 www.hsonatalf.org