Hyundai Sonata: Roof Trim / Roof Trim Assembly Repair procedures
| Replacement |
|

|

| 1. |
Remove the front seat.
(Refer to Front Seat - "Front Seat Assembly") |
| 2. |
Remove the rear seat.
(Refer to Rear Seat - "Rear Seat Assembly") |
| 3. |
Remove the front pillar trim.
(Refer to Interior Trim - "Front Pillar Trim") |
| 4. |
Remove the canter pillar upper trim.
(Refer to Interior Trim - "Center Pillar Trim") |
| 5. |
Remove the rear pillar trim.
(Refer to Interior Trim - "Rear Pillar Trim") |
| 6. |
Remove the sub sunvisor.
(Refer to Roof Trim - "Sunvisor") |
| 7. |
Remove the sunvisor and retainer.
(Refer to Roof Trim - "Sunvisor") |
| 8. |
Remove the assist handle.
(Refer to Roof Trim - "Assist Handle") |
| 9. |
Remove the overhead console lamp.
(Refer to Body Electrical System - "Overhead Console Lamp") |
| 10. |
Remove the room lamp.
(Refer to Body Electrical System - "Room Lamp") |
| 11. |
Disconnect the ECM mirror connector.
(Refer to Body Electrical System - "Electro Chromic Inside Rear View Mirror") |
| 12. |
Disconnect the rain sensor.
(Refer to Body Electrical System - "Rain Sensor") |
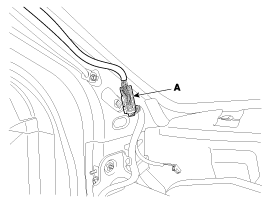
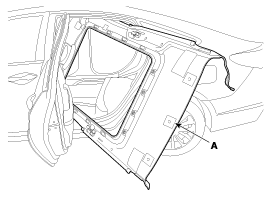
| 13. |
Disconnect the roof trim main connectors (A) and the mounting clips in the front pillar.
[Driver's]
[Passenger's]
|

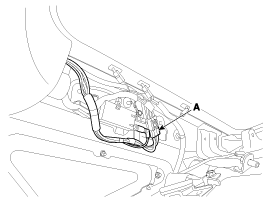
| 14. |
Disconnect the connectors (A) and the mounting clips in the rear pillar [RH].
|
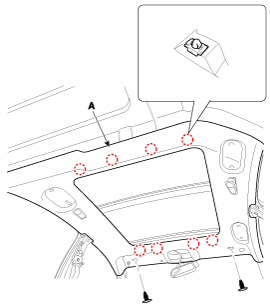
| 15. |
Remove the roof trim mounting clip and remove the roof trim assembly (A).
|
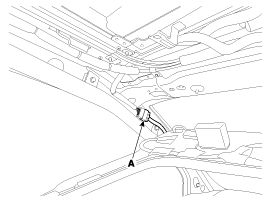
| 16. |
Disconnect the roof trim main connector (A).
|
| 17. |
Remove the roof trim assembly (A) from the body panel and then carry it out of the vehicle through the rear door.
|
| 18. |
Remove the vanity lamp.
(Refer to Body Electrical System - "Vanity Lamp") |
| 19. |
Remove roof trim wiring harness (A) from the roof trim (B).
|
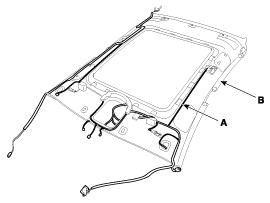

| 20. |
Install in the reverse order of removal.
|
 Roof Trim Assembly Components and Components Location
Component Location
1. Roof Trim Assembly
...
 Interior Trim
...
Other information:
Hyundai Sonata LF 2014-2019 Service Manual: Front Door Side Weatherstrip Repair procedures
Replacement
1.
Loosen the front door checker (B) mounting bolt.
2.
Detach the clips, then remove the front door side weatherstrip (A).
Tightening torque :
16.7 ~ 21.6 N.m (1.7 ~ 2.2 kgf.m, 12.3 ~ 15.9 lb-ft)
3.
Install in the reverse order of removal.
•
...
Hyundai Sonata LF 2014-2019 Owners Manual: TPMS (Tire Pressure Monitoring System) Malfunction Indicator
The TPMS Malfunction Indicator will illuminate after it blinks for approximately
one minute when there is a problem with the Tire Pressure Monitoring System.
Have the system checked by an authorized HYUNDAI dealer as soon as possible.
NOTICE
If there is a malfunction with the TPMS, the Low Tire Pr ...
