
Hyundai Sonata LF: Cooling System / Radiator Components and Components Location
| Components |
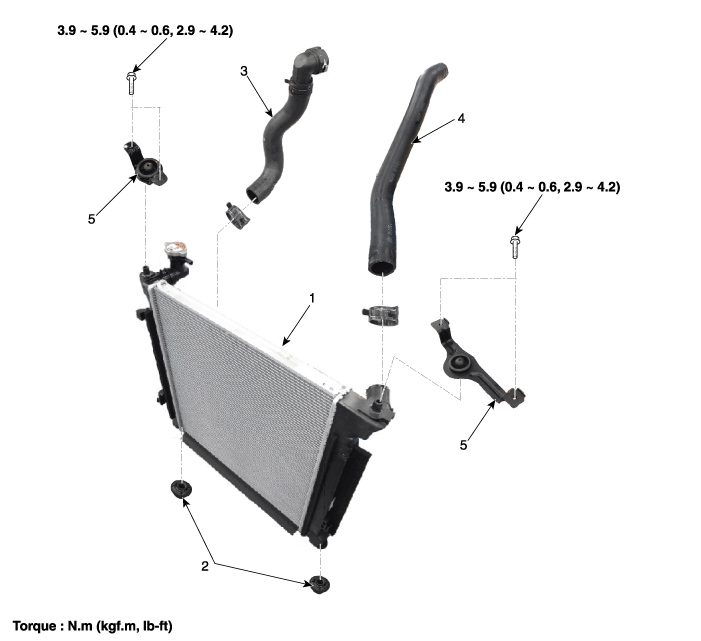
| 1. Radiator 2. Mounting insulator 3. Radiator lower hose | 4. Radiator upper hose 5. Upper mounting bracket |
 Coolant Repair procedures
Replacement And Air Bleeding Never remove the radiator cap when the engine is hot. Serious scalding could be caused by hot fluid under high pressure escaping from the radiator...
 Radiator Repair procedures
Removal and Installation 1. Remove the cooling fan. (Refer to Cooling System - "Cooling Fan") 2. Loosen the drain plug, and drain the coolant...
Other information:
Hyundai Sonata LF 2014-2019 Service Manual: Valve Clearance Adjustment
Valve Clearance Inspection And Adjustment Inspect and adjust the valve clearance when the engine is cold (Engine coolant temperature : 20°C) and cylinder head is installed on the cylinder block. 1. Remove the cylinder head cover...
Hyundai Sonata LF 2014-2019 Service Manual: Heater & A/C Control Unit (Manual) Repair procedures
Replacement 1. Disconnect the negative (-) battery terminal. 2. Using a screwdriver or remover, remove the center fascia panel (A). 3. Disconnect the A/C & heater controller connectors (A). 4. Remove the heater and A/C controller (A) from the center facia panel...
Categories
- Manuals Home
- Hyundai Sonata Owners Manual
- Hyundai Sonata Service Manual
- DCT (Dual Clutch Transmission) System
- Steering System
- Suspension System
- New on site
- Most important about car
