Hyundai Sonata: Air Conditioning System / Receiver-Drier Repair procedures
Hyundai Sonata LF 2014-2019 Service Manual / Heating, Ventilation and Air Conditioning / Air Conditioning System / Receiver-Drier Repair procedures
| Replacement |
| 1. |
Remove the condenser. |
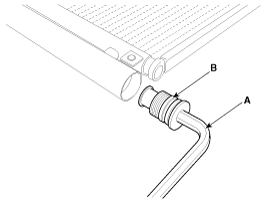
| 2. |
Remove the cap (B) on the bottom of the condenser with a L wrench [Hex 14] (A).
|
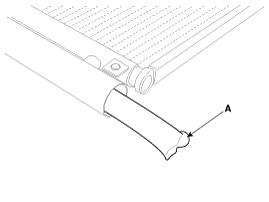
| 3. |
Remove the receiver-drier (A) from condenser using a long
nose plier. Check for crumbled receiver-drier and clogged bottom cap
filter.
|
| 4. |
Apply air conditioning compressor oil along the O-rings and threads of the new bottom cap. |
| 5. |
Insert a new receiver-drier into the receiver drier tank. The
receiver-drier must be sealed in vacuum before it is exposed to air for
use. |
| 6. |
Install a new bottom cap to the condenser.
|

 Condenser Repair procedures
Inspection
1.
Check the condenser fins for clogging and damage. If clogged,
clean them with water, and blow them with compressed air. If bent,
gently bend them using a screwdriver or pliers.
...
 A/C Pressure Transducer Components and Components Location
Components Location
1. A/C Pressure Transducer
...
Other information:
Hyundai Sonata LF 2014-2019 Service Manual: Alignment Repair procedures
Front Wheel Alignment
When using a commercially available computerized wheel
alignment equipment to inspect the front wheel alignment, always
position the vehicle on a level surface with the front wheels facing
straight ahead.
Prior to inspection, make sure that the f ...
Hyundai Sonata LF 2014-2019 Service Manual: Repair procedures
Replacement
•
Put on gloves to protect your hands.
•
When prying with a flat-tip screwdriver or use a prying trim
tool, wrap it with protective tape, and apply protective tape around the
related parts, to prevent damage.
•
Ta ...
© 2018-2025 www.hsonatalf.org
