Hyundai Sonata: Power Windows / Power Window Motor Repair procedures
Hyundai Sonata LF 2014-2019 Service Manual / Body Electrical System / Power Windows / Power Window Motor Repair procedures
| Inspection |
|
Front Power Window Motor
| 1. |
Disconnect the negative (-) battery terminal. |
| 2. |
Remove the front door trim.
(Refer to Body - "Front Door Trim") |
| 3. |
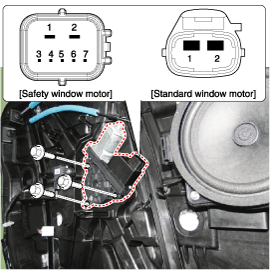
Disconnect the motor connector from the motor.
|
| 4. |
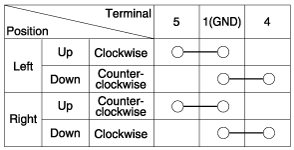
Connect the terminal No.1 and No.2 to battery voltage (12V)
and check that the motor operates smoothly when connecting the terminals
below.
[Safety Window Motor]
|
| 5. |
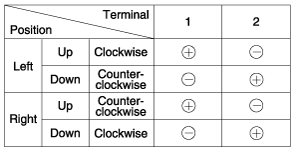
Connect the motor terminals directly to battery voltage (12V)
and check that the motor operates smoothly. Next, reverse the polarity
and check that the motor operates smoothly in the reverse direction. If
the operation is abnormal, replace the motor.
[Standard Window Motor]
|
Rear Power Window Motor
| 1. |
Disconnect the negative (-) battery terminal. |
| 2. |
Remove the rear door trim.
(Refer to Body - "Rear Door Trim") |
| 3. |
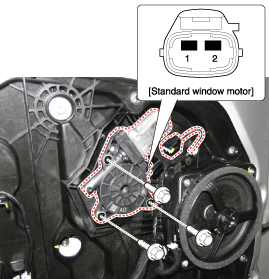
Disconnect the motor connector from the motor.
|
| 4. |
Connect the motor terminals No.1 and No.2 directly to battery voltage (12V) and check that the motor operates smoothly.
If the operation is abnormal, replace the motor.
[Safety Window Motor]
|
 Power Window Motor Schematic Diagrams
Circuit Diagram
...
 Power Window Switch Components and Components Location
Components
Driver Power Window Switch
Assist Power Window Switch
Rear Power Window Switch
...
Other information:
Hyundai Sonata LF 2014-2019 Service Manual: Input shaft speed sensor 2 Repair procedures
Removal
1.
Remove the air cleaner assembly and air duct.
(Refer to Engine Mechnical System - "Air cleaner")
2.
Remove the battery and tray.
(Refer to Engine Electrical System - "Battery")
3.
Remove the clutch actuator.
(Refer to Dual Clutch Control System - "Clutch Actuator")
4.
...
Hyundai Sonata LF 2014-2019 Service Manual: Repair procedures
Replacement
•
Be careful not to damage the fender and body.
•
When removing the clips, use a clip remover.
1.
Remove the front bumper.
(Refer to Front Bumper - "Front Bumper Cover")
2.
Remove the head lamps.
(Refer to Body Ele ...
© 2018-2025 www.hsonatalf.org


