Hyundai Sonata LF: Lighting System / Rheostat Repair procedures
| Inspection |
| 1. |
Disconnect the negative (-) battery terminal. |
| 2. |
Remove the crash pad lower panel.
(Refer to Body - "Crash Pad Lower Panel") |
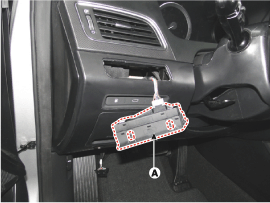
| 3. |
Remove the lower crash pad switch assembly (A) after disengaging the mounting clip.
|
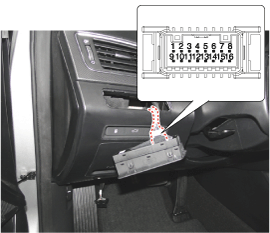
| 4. |
Remove the rheostat switch connector (A).
|
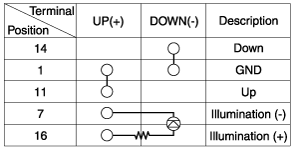
| 5. |
Check for intensity of new rheostat switch. If the light
intensity of the lamps changes smoothly without any flickering when the
rheostat is turned, it can be assumed that the rheostat is normal.
|

 Front Fog Lamps Repair procedures
Removal 1. Disconnect the negative (-) battery terminal. 2. Remove the front bumper. (Refer to Body - "Front Bumper Cover") 3. Disconnect the front fog lamp connector (A)...
Other information:
Hyundai Sonata LF 2014-2019 Service Manual: Description and Operation
Description BSD is a system that uses two magnetic wave radar sensors attached on the rear panel to measure the distance from the following vehicles and provides the sensing and (visual and auditory) alarm of any vehicle coming into the blind spot...
Hyundai Sonata LF 2014-2019 Service Manual: Timing Chain Repair procedures
Removal 1. Turn the crankshaft pulley clockwise, and align its groove with the timing mark of the timing chain cover. 2. Remove the timing chain cover. (Refer to Timing System - "Timing Chain Cover") 3. Align the timing marks of the CVVT sprockets with the upper surface of the cylinder head to make No...
Categories
- Manuals Home
- Hyundai Sonata Owners Manual
- Hyundai Sonata Service Manual
- Suspension System
- Timing System
- Body Electrical System
- New on site
- Most important about car
