Hyundai Sonata LF: Interior Trim / Rear Package Tray Trim Repair procedures
Hyundai Sonata LF 2014-2019 Service Manual / Body (Interior and Exterior) / Interior Trim / Rear Package Tray Trim Repair procedures
| Replacement |
|

|

| 1. |
Remove the rear seat cushion assembly.
(Refer to Rear Seat - "Rear Seat Assembly") |
| 2. |
Remove the rear seat back assembly.
(Refer to Rear Seat - "Rear Seat Assembly") |
| 3. |
Slighty remove the rear door weatherstrip. |
| 4. |
Remove the rear door scuff trim.
(Refer to Interior Trim - "Door Scuff Trim") |
| 5. |
Remove the rear pillar trim.
(Refer to Interior Trim - "Rear Wheel House Trim") |
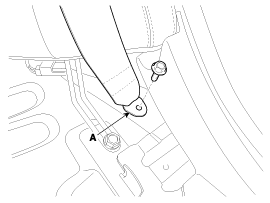
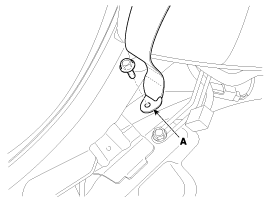
| 6. |
After loosening the mounting bolt, then remove the rear seat belt lower anchor (A).
[LH]
[RH]
|
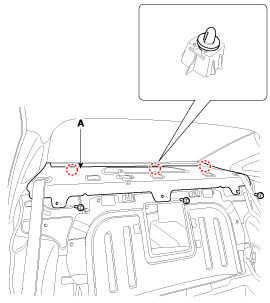
| 7. |
After loosening the mounting screws, then remove the rear package tray trim (A).
|
| 8. |
Install in the reverse order of removal.
|


 Trunk Trim. Repair procedures
Repair procedures Replacement • Put on gloves to protect your hands. • When prying with a flat-tip screwdriver or use a prying trim tool, wrap it with protective tape, and apply protective tape around the related parts, to prevent damage...
Other information:
Hyundai Sonata LF 2014-2019 Service Manual: Special Service Tools
S..
Hyundai Sonata LF 2014-2019 Service Manual: TPMS Receiver Description and Operation
Description 1. Mode (1) Virgin State A. The receiver as a sole part is shipped in this state. Replacement parts should therefore arrive in this state. B. In this state, there is no Auto-Location, no sensor wake-up, no sensor monitoring and no DTC monitoring...
Categories
- Manuals Home
- Hyundai Sonata Owners Manual
- Hyundai Sonata Service Manual
- Engine Control / Fuel System
- Body Electrical System
- Emission Control System
- New on site
- Most important about car

Copyright © 2026 www.hsonatalf.org