Hyundai Sonata LF: Cooling System / Radiator Repair procedures
Hyundai Sonata LF 2014-2019 Service Manual / Engine Mechanical System / Cooling System / Radiator Repair procedures
| Removal and Installation |
| 1. |
Remove the cooling fan.
(Refer to Cooling System - "Cooling Fan") |
| 2. |
Loosen the drain plug, and drain the coolant. |
| 3. |
Remove the radiator cap to speed draining. |
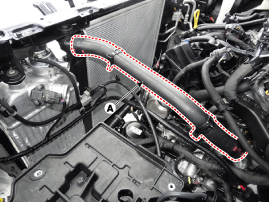
| 4. |
Remove the radiator upper hose (A) and lowr hose (B).
|
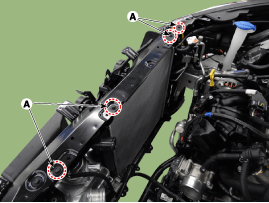
| 5. |
Remove the radiator upper bracket bolts(A).
|
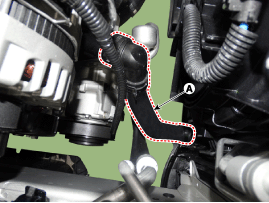
| 6. |
Disconnect the return hose(A).
|
| 7. |
Remove the air guard(A) and intercooler air guard(B).
|
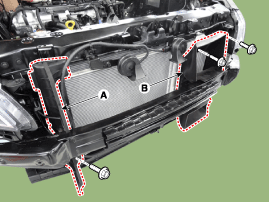
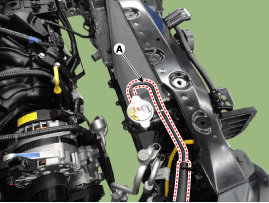
| 8. |
Loosen the radiator mounting bolts(A)
|
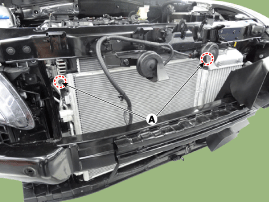
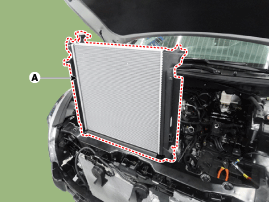
| 9. |
Pull the radiator (A) upward and remove it from engine room.
|
| 10. |
Install in the reverse order of removal.
|

| Inspection |
Radiator Cap Testing
| 1. |
Remove the radiator cap, wet its seal with engine coolant, and then install it on a pressure tester.
|
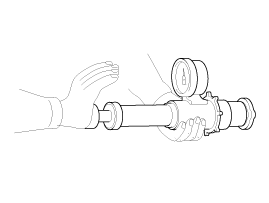
| 2. |
Apply a pressure of 93.16~122.58kpa (0.95~1.25kg/cm?, 13.51~17.78psi). |
| 3. |
Check for a drop in pressure. |
| 4. |
If the pressure drops, replace the cap. |
Radiator Leakage Test
| 1. |
Wait until engine is cool, then carefully remove the radiator
cap and fill the radiator with engine coolant, then install a pressure
tester on it.
|

| 2. |
Apply a pressure of 93~123kPa (0.95~1.25kgf/cm?, 14~1
9psi). |
| 3. |
Inspect for engine coolant leaks and a drop in pressure. |
| 4. |
If the pressure drops, check hoses, the radiator and the
water pump for leakage. If there is no leakage, inspect the heater core,
the cylinder block and the cylinder head. |
| 5. |
Remove the tester and reinstall the radiator cap.
|


Other information:
Hyundai Sonata LF 2014-2019 Service Manual: Rear Shock Absorber Repair procedures
Replacement 1. Raise the vehicle, and make sure it is securely supported. 2. Remove the wheel cap (A). Be careful not to damage to the wheel cap (A) when removing the it. 3. Remove the front wheel and tire (A) from front hub...
Hyundai Sonata LF 2014-2019 Service Manual: Knee Airbag (KAB) Module Repair procedures
Removal 1. Disconnect the battery negative cable and wait for at least three minutes before beginning work. 2. Remove the crash pad lower panel. (Refer to Body - "Crash Pad Lower Panel") 3. Remove the mounting nuts (A). 4. Disconnect the knee airbag connector (B)...
Categories
- Manuals Home
- Hyundai Sonata Owners Manual
- Hyundai Sonata Service Manual
- Engine Control System
- Audio
- Driveshaft and axle
- New on site
- Most important about car

Copyright © 2026 www.hsonatalf.org