Hyundai Sonata LF: Lighting System / High Mounted Stop Lamp Repair procedures
Hyundai Sonata LF 2014-2019 Service Manual / Body Electrical System / Lighting System / High Mounted Stop Lamp Repair procedures
| Removal |
| 1. |
Disconnect the negative (-) battery terminal. |
| 2. |
Remove the rear package tray trim.
(Refer to Body - "Rear Package Tray Trim") |
| 3. |
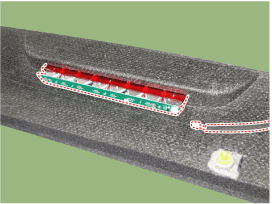
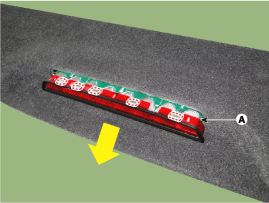
Remove the high mounted stop lamp after disengaging the mounting clip.
|
| Installation |
| 1. |
Install the rear high mounted stop lamp. |
| 2. |
Install the package tray trim. |
| 3. |
Connect the negative (-) battery terminal. |
 License Lamps Repair procedures
Removal 1. Disconnect the negative (-) battery terminal. 2. Remove the trunk lid panel. (Refer to Body - "Trunk Lid Trim") 3. Remove the license lamp after disengaging the license lamp mounting clip (A)...
 Rear Combination Lamp Repair procedures
Removal 1. Disconnect the negative (-) battery terminal. 2. Loose the nuts (4EA) holding the rear combination lamp then disconnect the connector (A) then remove the outside rear combination lamp assembly...
Other information:
Hyundai Sonata LF 2014-2019 Service Manual: Horn
Components and Components Location Component Location 1. Horn switch2. Horn relay (Built - in Metal Core Block PCB)3. Horn (Low pitch)4. Horn (High pitch)5. Clock spring Repair procedures Removal 1. Remove the front bumper cover. (Refer to Body - "Front Bumper Cover") 2...
Hyundai Sonata LF 2014-2019 Service Manual: Components and Components Location
C..
Categories
- Manuals Home
- Hyundai Sonata Owners Manual
- Hyundai Sonata Service Manual
- DCT (Dual Clutch Transmission) System
- Front Driveshaft Repair procedures
- Body Electrical System
- New on site
- Most important about car

Copyright © 2026 www.hsonatalf.org