
Hyundai Sonata LF: Lighting System / Rear Combination Lamp Repair procedures
Hyundai Sonata LF 2014-2019 Service Manual / Body Electrical System / Lighting System / Rear Combination Lamp Repair procedures
| Removal |
| 1. |
Disconnect the negative (-) battery terminal. |
| 2. |
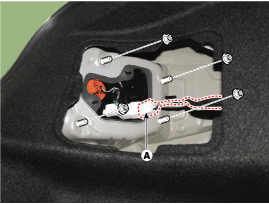
Loose the nuts (4EA) holding the rear combination lamp then
disconnect the connector (A) then remove the outside rear combination
lamp assembly.
|
| 3. |
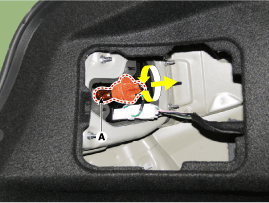
Remove the bulb (A) after turnicng in the counter clock-wise direction.
|
| 4. |
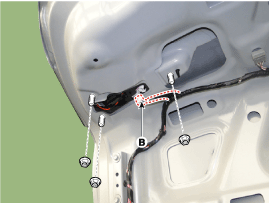
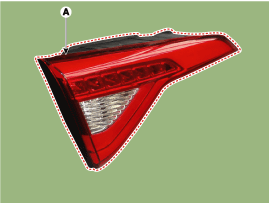
Remove the inside rear combination lamp assembly (A) after loosening the nuts (3EA) and disconnecting the connector (B).
|
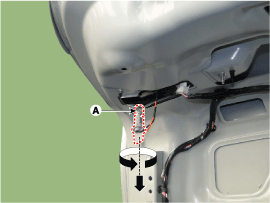
| 5. |
If it is necessary to replace the bulb, remove the bulb after removing the trunk lid trim. |
| 6. |
Remove the bulb (A) after separating the inside rear combination lamp assembly.
|
| Installation |
| 1. |
Install the inside combination lamp assembly after assembling the bulb. |
| 2. |
Install the rear combination lamp assembly after assembling the bulbs and connecting the lamp connector. |
 High Mounted Stop Lamp Repair procedures
Removal 1. Disconnect the negative (-) battery terminal. 2. Remove the rear package tray trim. (Refer to Body - "Rear Package Tray Trim") 3...
 Auto Lighting Control System
Specifications Specifications ItemsSpecificationsRated voltage5VLoadMax. 1mA (Relay load)Illuminations (LUX)501.42 ± 0.31V1002.63 ± 0.58V1503.84 ± 0...
Other information:
Hyundai Sonata LF 2014-2019 Service Manual: Muffler Components and Components Location
C..
Hyundai Sonata LF 2014-2019 Service Manual: Engine Mounting Repair procedures
Removal and Installation Rollroad Mounting 1. Rollroad bracket mounting bolts and rollroad bracket (A). Tightening torque Bolt (B) : 107.9 ~ 127.5 N.m (11.0 ~ 13.0 kgf.m, 79.6 ~ 94.0 lb-ft) Bolt (C) : 49.0 ~ 63.7 N.m (5.0 ~ 6.5 kgf.m, 36...
Categories
- Manuals Home
- Hyundai Sonata Owners Manual
- Hyundai Sonata Service Manual
- Driveshaft and axle
- Engine And Transmission Assembly
- DCT (Dual Clutch Transmission) System
- New on site
- Most important about car

Copyright © 2026 www.hsonatalf.org