Hyundai Sonata LF: Audio / Audio Unit Repair procedures
| Removal |
| 1. |
Disconnect the negative (-) battery terminal. |
| 2. |
Remove the cluster fascia upper panal.
(Refer to Body - "Cluster Fascia Upper Panel") |
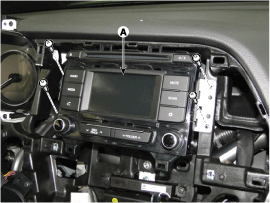
| 3. |
Remove the audio head unit (A) after loosening the screws.
|
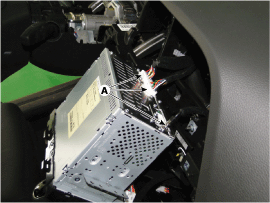
| 4. |
Remove the audio head unit after disconnecting the connectors and cable (A).
|

| Installation |
| 1. |
Connect the audio unit connectors and cable. |
| 2. |
Install the audio head unit. |
| 3. |
Install the cluster fascia upper panel. |
| 4. |
Connect the negative (-) battery terminal.
|

 Speakers Repair procedures
Inspection 1. Troubleshooting for Speaker (1) Basic inspection of speaker Inspect the sound from speaker after verifying that the speaker mounting screws is removed and the wiring connector is connected precisely to remove vibration transmitted from body trims and surrounding parts...
Other information:
Hyundai Sonata LF 2014-2019 Service Manual: Description and Operation
Description AVN System The AVN system has improved information search and easiness of manipulation for the driver by simplifying the system operation experience and unifying the display of the user information such as multimedia and car information...
Hyundai Sonata LF 2014-2019 Service Manual: Master Cylinder Repair procedures
Removal 1. Turn ignition switch OFF and disconnect the negative (-) battery cable. 2. Remove the air cleaner assembly (A). 3. Disconnect the brake fluid level switch connector (A). 4. Remove the brake fluid from the master cylinder reservoir with a syringe...
Categories
- Manuals Home
- Hyundai Sonata Owners Manual
- Hyundai Sonata Service Manual
- Engine Control System
- Engine And Transmission Assembly
- Heating, Ventilation and Air Conditioning
- New on site
- Most important about car
