Hyundai Sonata LF: Lighting System / Head Lamps Repair procedures
| Inspection |
| 1. |
Check the battery voltage. (Low beam will be on when the battery voltage above 9V.) |
| 2. |
Check the fuse and relay. |
| 3. |
Check the polarity of ballast. (If the polarity are changed, low beam doesn't lighten) |
| 4. |
Check the bulb connector securely. |
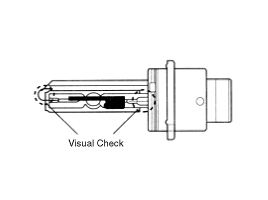
| 5. |
Visually bulb checking (no filament) : damaged glass, damaged for upper parts and lower parts of glass tube. |
| 6. |
After (1)~(5), replace the ballast and the ignitor. (ballast assembly).
|
| 1. |
Durable for vibration as there is no filament. |
| 2. |
HID lamp had a more long life than halogen lamp. |
| 3. |
Does not operate if polarity is changed. |
| 4. |
Operating input voltage : 9-16V |
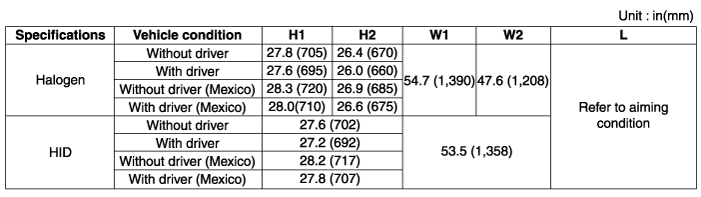
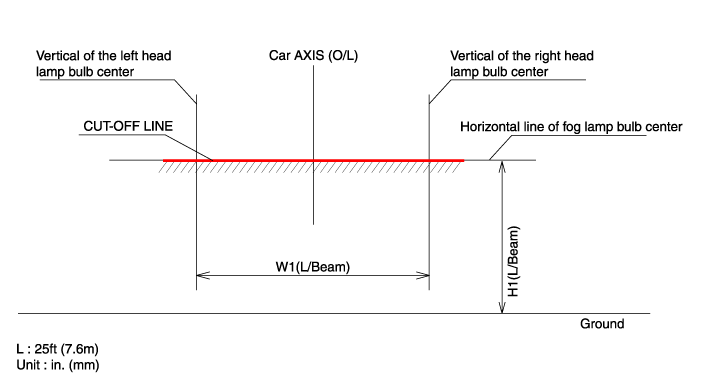
| Head Lamp Aiming Instructions |
| [Mechanical Aiming] |
If there are any regulations pertinent to the aiming of head
lamps in the area where the vehicle is to be used, adjust so as to meet
those requirements. |

| 1. |
Inflate the tires to the specified pressure and remove any loads from the vehicle except the driver, spare tire, and tools. |
| 2. |
The vehicle should be placed on a flat floor. |
| 3. |
Draw vertical lines (Vertical lines passing through
respective head lamp centers) and a horizontal line (Horizontal line
passing through center of head lamps) on the screen. |
| 4. |
With the head lamp and battery in normal condition, aim the head lamps so the brightest portion falls on the vertical lines.
A : Vertical
|
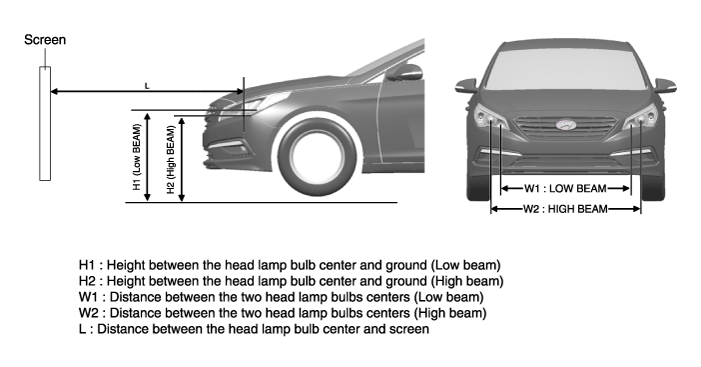
| 1. |
Head Lamp (Low beam)
|
| Removal |
| 1. |
Disconnect the negative (-) battery terminal. |
| 2. |
Remove the front bumper cover.
(Refer to Body - "Front Bumper Cover") |
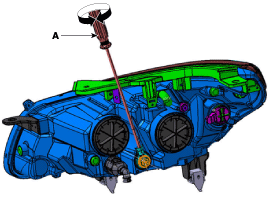
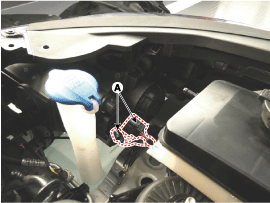
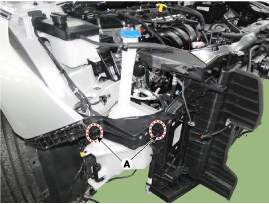
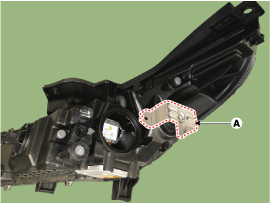
| 3. |
Disconnect the head lamp connector (A).
|
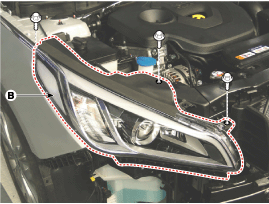
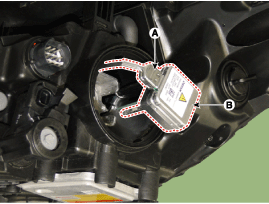
| 4. |
Remove the head lamp (B) mounting bolts.
|
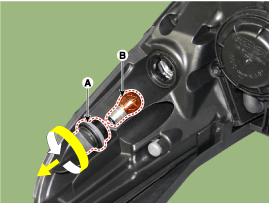
| 5. |
Remove the bulb caps from the head lamp assembly afterturning in the counter clock-wise direction.
|
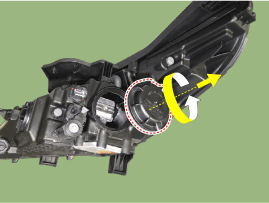
| 6. |
Remove the Bracket (A) after loosening the mounting screws.
[HID Type]
|
| 7. |
Disconnect the ignitor connector (A). |
| 8. |
Remove the ignitor lamp (B).
|
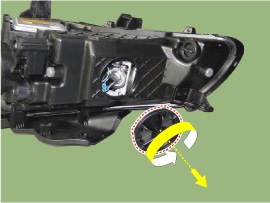
| 9. |
Remove the turn signal socket (A). |
| 10. |
Remove the turn signal lamp (B).
|
| Installation |
| 1. |
Install the head lamp assembly after connecting the connector. |
| 2. |
Install the front bumper corver. |
| 3. |
Connect the negative (-) battery terminal. |
| Replacement |
| 1. |
Turn the head lamp switch off. |
| 2. |
Remove the lamp assembly. |
| 3. |
Disconnect the power connector from the lamp. |
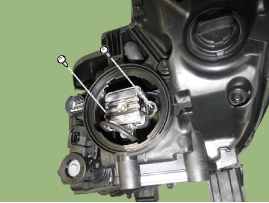
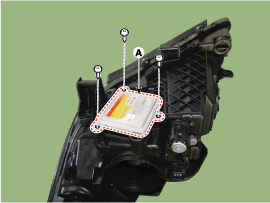
| 4. |
Remove the ballast (A) after loosening the screws.
|
| 5. |
Installation is the reverse of removal.
|

 Head Lamps Description and Operation
HID Head Lamp 1. Bulb (1) Elements Xenon gas : Xenon gas activates the initial reaction for rapid illuminating. Molybdenum electrode: anode arcing Metal halide salts: color composing component (2) Lightening principle When Xenon gas and metal halide salt will discharge the molybdenum anode in a capsule, it emits light...
 Room Lamp Repair procedures
Removal Room Lamp (Non-Panorama Sunroof) 1. Disconnect the negative (-) battery terminal. 2. Using a screwdriver or remover, Separate the room lamp lens (A) from the room lamp...
Other information:
Hyundai Sonata LF 2014-2019 Service Manual: Specifications
Specifications ItemsSpecificationHoodTypeRear hinged, gas lifter typeFront DoorConstructionFront hinged, full door constructionRegulator systemWire drum typeLocking systemPin-fork systemRear DoorConstructionFront hinged, full door constructionRegulator systemWire drum typeLocking systemPin-fork systemTrunk LidTypeFront hinged, power trunk lid type (option)Seat BeltsFront3 point type with Emergency Locking Retractor (E...
Hyundai Sonata LF 2014-2019 Service Manual: Components and Components Location
C..
Categories
- Manuals Home
- Hyundai Sonata Owners Manual
- Hyundai Sonata Service Manual
- Engine And Transmission Assembly
- Body Electrical System
- Brake System
- New on site
- Most important about car
