Hyundai Sonata LF: Cylinder Head Assembly / Cylinder Head Repair procedures
Hyundai Sonata LF 2014-2019 Service Manual / Engine Mechanical System / Cylinder Head Assembly / Cylinder Head Repair procedures
| Removal |
Engine removal is not required for this procedure.
|

Mark all wiring and hoses to avoid misconnection.
|

| 1. |
Remove the engine cover. |
| 2. |
Disconnect the battery negative terminal. |
| 3. |
Remove the air duct and air cleaner assembly.
(Refer to Intake and Exhaust System - "Air Cleaner") |
| 4. |
Disconnect the mounting bracket and then remove the battery.
(Refer to Engine Electrical System - "Battery") |
| 5. |
Disconnect the ECM connector and then remove the battery tray.
(Refer to Engine Electrical System - "Battery") |
| 6. |
Remove the battery tray.
(Refer to Engine Electrical System - "Battery") |
| 7. |
Remove the engineroom under cover. |
| 8. |
Loosen the drain plug and drain the coolant. Open the radiator cap to make rapid draining.
(Refer to Cooling System - "Coolant") |
| 9. |
Remove the radiator upper hose and lower hose.
(Refer to Cooling System - Radiator Hose") |
| 10. |
Disconnect the intercooler inlet and outlet hose.
(Refer to Intake and Exhaust System - "Intercooler Pipe and Hose") |
| 11. |
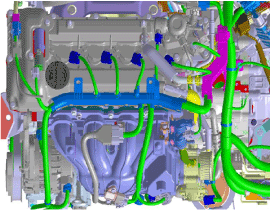
Disconnect the engine wiring connector and haness clamp and then remove the cylinder head protector and wiring from engine.
|
| 12. |
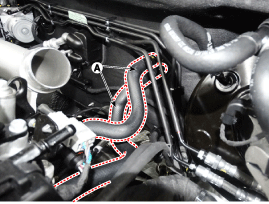
Disconnect the brake booster vacuum hose(A).
|

| 13. |
Remove the heater hose (A).
|
| 14. |
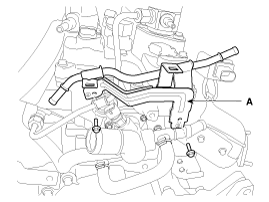
Remove the vacuum pipe assembly (A).
|
| 15. |
Remove the cylinder head cover.
(Refer to Cylinder Head Assembly - "Cylinder Head Cover") |
| 16. |
Remove the timing chain cover.
(Refet to Timing System - "Timing Chain Cover") |
| 17. |
Remove the timing chain.
(Refer to Timing System - "Timing Chain") |
| 18. |
Remove the camshaft.
(Refer to Cylinder Head Assembly - "Camshaft") |
| 19. |
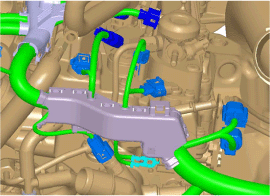
Remove the intake manifold.
(Refer to Intake And Exhaust System - "Intake Manifold") |
| 20. |
Remove the turbo manifold.
(Refer to Intake And Exhaust System - "Exhaust Manifold") |
| 21. |
Remove the delivery pipe assembly.
(Refer to Fuel System - "Delivery Pipe") |
| 22. |
Disconnect the bypass hose, and then remove the water temperature control assembly.
(Refer to Cooling System - "Water Temperature Control Assembly") |
| 23. |
Remove the heater pipe.
(Refet to Cooling System - "Water Pipe") |
| 24. |
Remove the intake OCV(Oil Control Valve).
(Refer to Fuel System - "CVVT Oil Control Valve") |
| 25. |
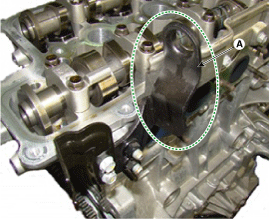
Remove the rear hanger (A).
|
| 26. |
Remove the cylinder head cover heat protector (A).
|
| 27. |
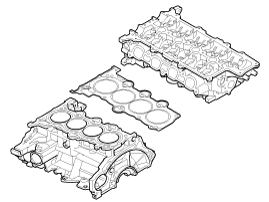
Remove the cylinder head bolts, then remove the cylinder head.
|
| Disassembly |
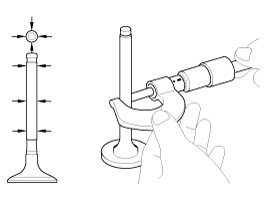
Identify MLA(Mechanical lash adjuster), valves, valve springs
as they are removed so that each item can be reinstalled in its
original position. |
| 1. |
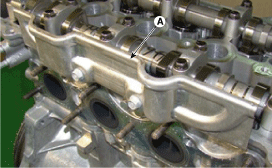
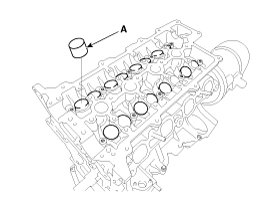
Remove the MLAs (A).
|
| 2. |
Remove the valves.
|
| Inspection |
| Cylinder Head |
| 1. |
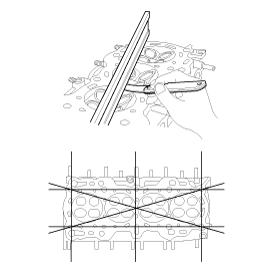
Inspect for flatness.
Using a precision straight edge and feeler gauge, measure the
surface the contacting the cylinder block and the manifolds for
warpage.
|
| 2. |
Inspect for cracks.
Check the combustion chamber, intake ports, exhaust ports and
cylinder block surface for cracks. If cracked, replace the cylinder
head. |
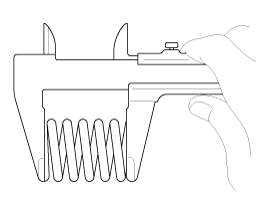
Valve And Valve Spring
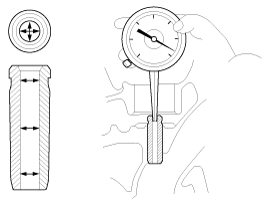
| 1. |
Inspect the valve stems and valve guides.
|
| 2. |
Inspect the valves.
|

| 3. |
Inspect the valve seats.
|
| 4. |
Inspect the valve springs.
|
| Reassembly |
|
| 1. |
Install the valves.
|
| 2. |
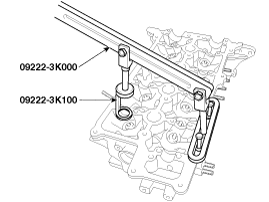
Using the SST (09222-3K000, 09222-3K100), compress the spring and install the retainer locks.
After installing the valves, ensure that the retainer locks are correctly in place before releasing the valve spring compressor.
|
| 3. |
Lightly tap the end of each valve stem two or three times
with the wooden handle of a hammer to ensure proper seating of the valve
and retainer lock. |
| 4. |
Install the MLA(Mechanical lash adjuster)s.
Check that the MLA (A) rotates smoothly by hand.
|
| Installation |
|
| 1. |
Install the cylinder head assembly.
|
| 2. |
Place the cylinder head carefully not to damage the gasket.
|
| 3. |
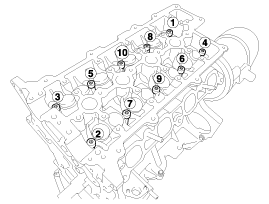
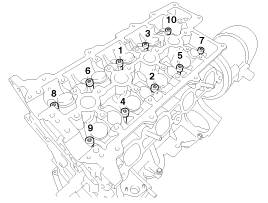
Install the cylinder head bolts with washers.
|
| 4. |
Install the head cover heat protector (A).
|
| 5. |
Install the rear hanger (A).
|
| 6. |
Install the oil control valve(OCV).
(Refer to Fuel System - "CVVT Oil Control Valve (OCV)") |
| 7. |
Install the heater pipe.
(Refer to Cooling System - "Water Pipe") |
| 8. |
Install the weter control assembly, and bypass hose.
(Refer to Cooling System - "Water Control Assembly") |
| 9. |
Install the delivery pipe assembly.
(Refer to Fuel System - "Delivery Pipe") |
| 10. |
Install the intake manifold.
(Refer to Intake And Exhaust System - "Intake Manifold") |
| 11. |
Install the turbo manifold.
(Refer to Intake And Exhaust System - "Exhaust Manifold") |
| 12. |
Install the cam shaft.
(Refer to Cylinder Head Assembly - "Cam Shaft") |
| 13. |
Install the timing chain.
(Refer to Timing System - "Timing Chain") |
| 14. |
Install the timing chain cover.
(Refer to Timing System - "Timing Chain Cover) |
| 15. |
Install the cylinder head cover.
(Refer to Cylinder Head Assembly - "Cylinder Head Cover")
|
| 16. |
Install the vacuum pipe assembly (A).
|
| 17. |
Connect the heater hose (A).
|
| 18. |
Connect the brake vacuum hose (A).
|
| 19. |
Install in the reverse order of removal. |
Perform the following :
|
 Cylinder Head Components and Components Location
Components 1. Cylinder head assembly2. MLA3. Retainer lock4. Retainer 5. Valve stem seal6. Valve spring7. Valve spring seat8. OCV (Oil Control Valve)9...

Other information:
Hyundai Sonata LF 2014-2019 Service Manual: Refrigerant Line Components and Components Location
C..
Hyundai Sonata LF 2014-2019 Service Manual: Antenna Coil Repair procedures
Removal 1. Disconnect the negative (-) battery terminal. 2. Remove the crash pad lower panel. (Refer to Body - "Crash Pad Lower Panel") 3. Disconnect the 6P connector (B) of the coil antenna and then remove the coil antenna (A) after loosening the screw...
Categories
- Manuals Home
- Hyundai Sonata Owners Manual
- Hyundai Sonata Service Manual
- Audio
- Air Conditioning System
- Body Electrical System
- New on site
- Most important about car

Copyright © 2026 www.hsonatalf.org