Hyundai Sonata LF: Brake System / Brake Line Repair procedures
Hyundai Sonata LF 2014-2019 Service Manual / Brake System / Brake System / Brake Line Repair procedures
| Removal |
| 1. |
Disconnect the brake fiuid level switch connector, and remove the reservoir cap. |
| 2. |
Remove the brake fluid from the master cylinder reservior with a syringe.
|

| 3. |
Remove the wheel & tire. |
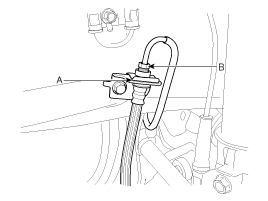
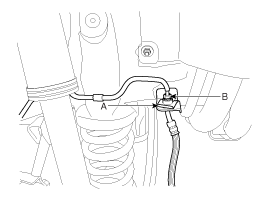
| 4. |
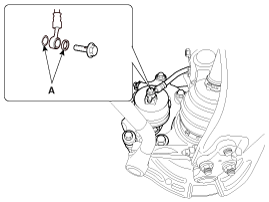
Disconnect the brake tube by loosening the tube flare nut (B).
Front
Rear
|
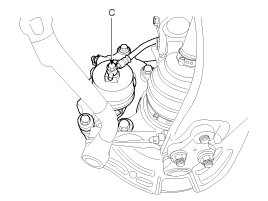
| 5. |
Remove the brake hose clip (A). |
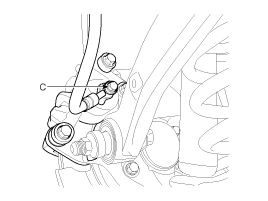
| 6. |
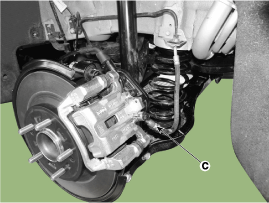
Disconnect the brake hose from the brake caliper by loosening the bolt (C).
[Front]
[General]
[EPB]
|
| Inspection |
| 1. |
Check the brake tubes for cracks, crimps and corrosion. |
| 2. |
Check the brake hoses for cracks, damage and fluid leakage. |
| 3. |
Check the brake tube flare nuts for damage and fluid leakage. |
| 4. |
Check brake hose mounting bracket for crack or deformation. |
| Installation |
| 1. |
Installation is the reverse of removal.
|
| 2. |
After installation, bleed the brake system.
(Refer to Brake System - "Brake System Bleeding")
(Refer to ABS - "ABS System Bleeding")
(Refer to ESP (Electronic Stability Program) System - "ESP System Bleeding") |
| 3. |
Check the spilled brake oil. |


Other information:
Hyundai Sonata LF 2014-2019 Service Manual: Audio Remote Control Repair procedures
Inspection 1. Check for resistance between terminals in each switch position (LH). [LH : Audio + Hands free] SwitchConnector TerminalResistance(±5%)SEEK Up2-5430 ?SEEK Down1.11 k?MODE2.11 k?MUTE3.11 k?Volume (+)4.61 k?Volume (-)6.81 k?Voice10.71 k?SEND18...
Hyundai Sonata LF 2014-2019 Service Manual: Speaker Repair procedures
Inspection 1. Troubleshooting for Speaker (1) Basic inspection of speaker Inspect the sound from speaker after verifying that the speaker mounting screws is removed and the wiring connector is connected precisely to remove vibration transmitted from body trims and surrounding parts...
Categories
- Manuals Home
- Hyundai Sonata Owners Manual
- Hyundai Sonata Service Manual
- Transmission Gear Oil Repair procedures
- Heating, Ventilation and Air Conditioning
- Engine Electrical System
- New on site
- Most important about car

Copyright © 2026 www.hsonatalf.org