Hyundai Sonata: BLUE LINK / BLUE LINK Unit Repair procedures
Hyundai Sonata LF 2014-2019 Service Manual / Body Electrical System / BLUE LINK / BLUE LINK Unit Repair procedures
| Removal |
| 1. |
Disconnect the negative (-) battery terminal. |
| 2. |
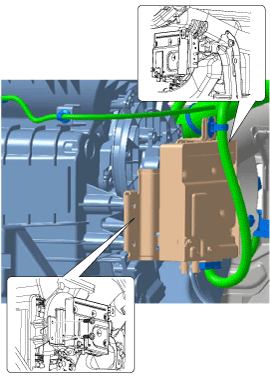
Remove the main crash pad assembly.
(Refer to Body - "Main Crash Pad Assembly") |
| 3. |
Remove the knee airbag (KAB) module.
(Refer to Restraint - "Knee Airbag (KAB) Module") |
| 4. |
Remove the driver's side shower duct.
(Refer to Heating, Ventilation and Air Conditioning - "Temperature Control Actuator") |
| 5. |
Remove the blue link unit after disconnect the connector and loosening the nut and screws.
|
| Installation |
| 1. |
Install the blue link unit. |
| 2. |
install the main crash pad. |
| 3. |
Connect the negative (-) battery terminal. |
| Inspection |
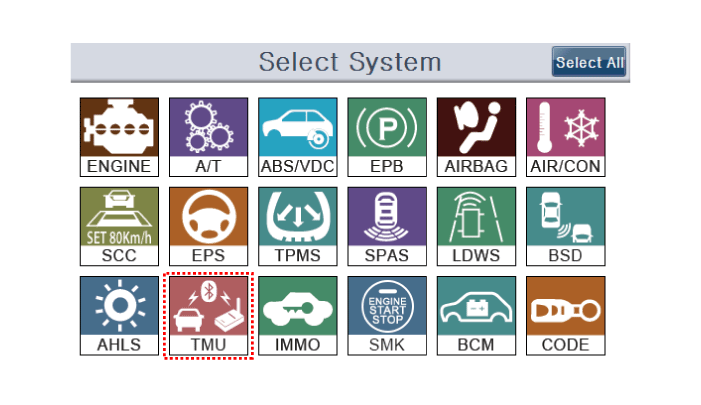
| Diagnosis with GDS |
| 1. |
The body electrocal system can be quickly diagnosed failed
parts with vehicle diagnostic system (GDS) The diagnostic system (GDS)
provides the following information.
|
| 2. |
Select the "Car Model" and the system to be checked in order to check the vehicle with the tester. |
| 3. |
Select the "Telematics Unit (TMU)" to check the telematics unit. |
| 4. |
Select the "Current Data" menu to search the current state of the input/output data.
The input/output data for the sensors corresponding to the TMU can be checked.
|
| 5. |
To check the DTC of the TMU, select "Diagnostic trouble codes". |
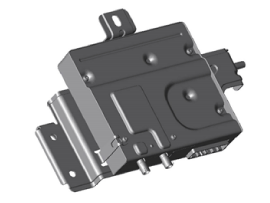
 BLUE LINK Unit Components and Components Location
Component (Only for the audio TMU System)
The Blue Link unit for AVN is equipped in the AVN head unit. ...
 BLUE LINK Remote Control Schematic Diagram
Schematic Diagrams
...
Other information:
Hyundai Sonata LF 2014-2019 Service Manual: Components and Components Location
Components
1. Memory power seat unit (PSM)2. IMS control switch3. Outside Mirror
...
Hyundai Sonata LF 2014-2019 Service Manual: Battery Components and Components Location
Components
1. Battery insulation pad2. Battery3. Battery tray4. Battery mounting bracket
...
© 2018-2025 www.hsonatalf.org
