Hyundai Sonata LF: AVN System / Speaker Repair procedures
| Inspection |
| 1. |
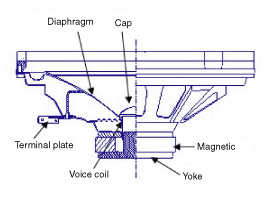
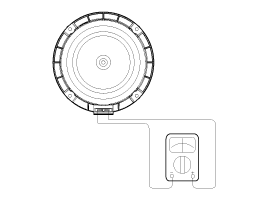
Troubleshooting for Speaker
| ||||||||||||||||||||||||||||||||||||||||||
| Removal |
| 1. |
Remove the front door trim.
(Refer to Body - "Front Door Trim") |
| 2. |
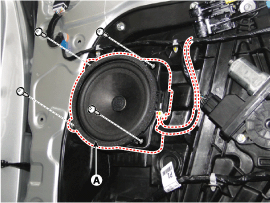
Remove the front door speaker (A) after disconnect the connector and loosening the screws.
|
| 1. |
Remove the Rear door trim.
(Refer to Body - "Rear Door Trim") |
| 2. |
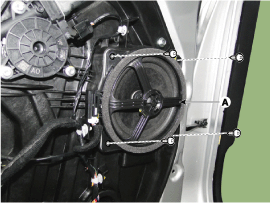
Remove the rear door speaker (A) after disconnect the connector and loosening the screws.
|
Take care not to scratch the crash pad and related parts. |
| 1. |
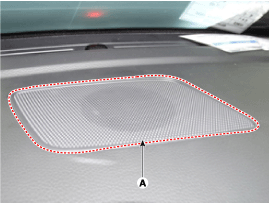
Using a screwdriver or remover, remove the crash pad center speaker grille (A).
|
| 2. |
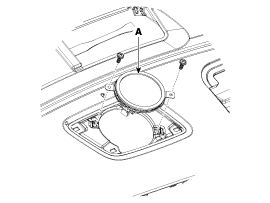
Remove the center speaker (A) after disconnect the connector and loosening the screws.
|
| 1. |
Remove the rear seat.
(Refer to Body - "Rear Seat") |
| 2. |
Remove the package tray trim.
(Refer to Body - "Rear Package Tray Trim") |
| 3. |
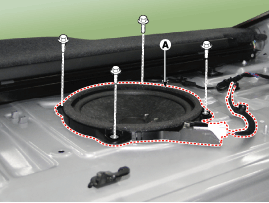
Remove the sub woofer speaker (A) after disconnect the connector and loosening the bolts.
|
| 1. |
Disconnect the negative (-) battery terminal. |
| 2. |
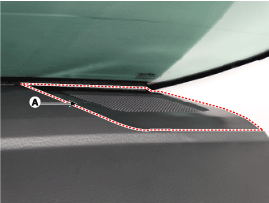
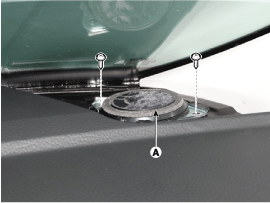
Remove the left/right crash pad side speaker grille (A).
|
| 3. |
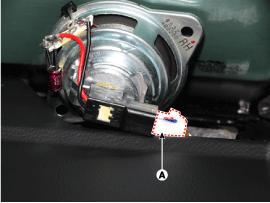
Remove the midrange speaker (A) after disconnect the connector and loosening the screws.
|
| Installation |
| 1. |
Install the front door speaker. |
| 2. |
Install the front door trim. |
| 1. |
Install the rear door speaker. |
| 2. |
Install the rear door trim. |
| 1. |
Install the center speaker. |
| 2. |
Install the center speaker grille. |
| 1. |
Install the midrange speaker |
| 2. |
Install the crash pad side speaker grille. |
| 3. |
Connect the negative (-) battery terminal. |
| 1. |
Install the subwoofer speaker. |
| 2. |
Install the rear package tray and rear seat. |
Make sure the speaker connectors are plugged in properly. |
 AVN Antenna Repair procedures
Inspection Glass Antenna Test 1. Wrap aluminum foil (A) around the tip of the tester probe (B) as shown. 2. Touch one tester probe to the glass antenna terminal (A) and move the other tester probe along the antenna wires to check that continuity exists...
Other information:
Hyundai Sonata LF 2014-2019 Service Manual: Stop Signal Electronic Module Components and Components Location
C..
Hyundai Sonata LF 2014-2019 Service Manual: Schematic Diagrams
Schematic [EPB Type] [General Type] Terminal Funtion [EPB Type] PIN NODesciptionCurrentmaxmin1Voltage supply for pump motor39A 10A 2RR EPB motor power30A - 3RR EPB motor ground30A - 4- - - 5Local CAN High 30mA 20mA 6Electric parking brake signal 1 20mA - 7Electric parking brake signal 220mA - 8Electric parking brake signal 320mA - 9Electric parking brake signal 420mA - 10- - - 11- - - 12RL EPB motor ground30A - 13RL EPB motor power30A - 14Ground for solenoid valves and ECU30A 10A 15- - - 16ESS200mA 100mA 17FR Wheel speed sensor signal16...
Categories
- Manuals Home
- Hyundai Sonata Owners Manual
- Hyundai Sonata Service Manual
- Engine Electrical System
- Engine And Transmission Assembly
- Air Conditioning System
- New on site
- Most important about car

