Hyundai Sonata LF: Quarter Fixed Glass / Quarter Fixed Glass Repair procedures
Hyundai Sonata LF 2014-2019 Service Manual / Body (Interior and Exterior) / Quarter Fixed Glass / Quarter Fixed Glass Repair procedures
| Removal |
Put on gloves to protect your hands. |
|
| 1. |
Remove the rear pillar trim.
(Refer to Interior Trim - "Rear Pillar Trim") |
| 2. |
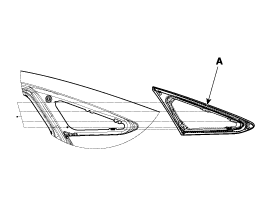
Loosen the quarter fixed glass (A) mounting nuts.
|
| 3. |
Cut out the quarter fixed glass sealant using the utility knife.
|
| Installation |
| 1. |
With a utility knife, scrape the old adhesive smooth to a
thickness of about 2mm (0.08 in.) on the bonding surface around the
entire quarter fixed glass flange.
|
| 2. |
Clean the body bonding surface with a sponge dampened in
alcohol. After cleaning, keep oil, grease and water from getting on the
surface. |
| 3. |
With a sponge, apply a light coat of glass primer along the
edge of the quarter fixed glass as shown, then lightly wipe it off with
gauze or cheese cloth :
|
| 4. |
With a sponge, apply a light coat of body primer to the
original adhesive remaining around the flange. Let the body primer dry
for at least 10 minutes.
|
| 5. |
Pack adhesive into the cartridge without air pockets to
ensure continuous delivery. Put the cartridge in a caulking gun, and run
a bead of sealant around the edge of the quarter fixed glass (A) as
shown. Apply the adhesive within 30 minutes after applying the glass
primer. Make a slightly thicker bead at each corner.
|
| 6. |
Install the quarter fixed glass. |
| 7. |
Let the adhesive dry for at least one hour, then spray water
over the quarter fixed glass and check for leaks. Mark the leaking
areas, let the quarter fixed glass dry, then seal with sealant. Let the
vehicle stand for at least four hours after quarter fix. |
| 8. |
Reinstall all remaining removed parts. |
| 9. |
Install the rear pillar trim. |
 Floor Carpet
..
Other information:
Hyundai Sonata LF 2014-2019 Service Manual: Relay Box (Engine Compartment) Repair procedures
Inspection 1. Disconnect the negative (-) battery terminal. 2. Pull out the relay from the engine compartment relay block. Power Relay (Type A) Check for continuity between the terminals. 1) Start relay 2) Deicer relay 3) Head lamp (high) relay 4) Blower relay 5) Power outlet relay 6) E-CVVT relay 1...
Hyundai Sonata LF 2014-2019 Service Manual: Specifications
Specifications Fuel Delivery System ItemsSpecificationFuel TankCapacity70 lit. (18.5 U.S.gal., 74.0 U.S.qt., 61.6 Imp.qt.)Fuel FilterTypePaper typeFuel PressureLow Pressure Fuel Line480 ~ 500 kPa (4.89 ~ 5.1 kgf/cm?, 69.6 ~ 72.5 psi)High Pressure Fuel Line2...
Categories
- Manuals Home
- Hyundai Sonata Owners Manual
- Hyundai Sonata Service Manual
- Body Electrical System
- Brake System
- Heating, Ventilation and Air Conditioning
- New on site
- Most important about car
Copyright © 2025 www.hsonatalf.org


