Hyundai Sonata LF: Intake And Exhaust System / Intake Manifold Repair procedures
| Removal and Installation |
| 1. |
Remove the engine cover. |
| 2. |
Disconnect the battery negative terminal. |
| 3. |
Disconnect the engine wiring connector and haness clamp and disconnect the wiring from intake manifold.
|
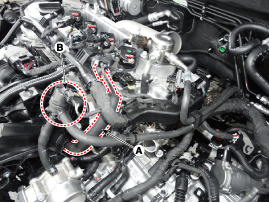
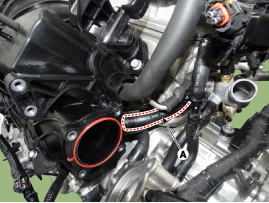
| 4. |
Disconnect the PCV (Positive crankcase ventilation) hose (A) and the PCSV (Purge control solenoid valve) (B).
|
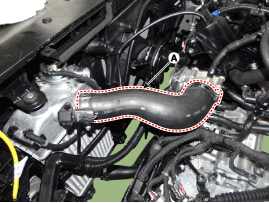
| 5. |
Remove the intercooler outlet hose (A).
|
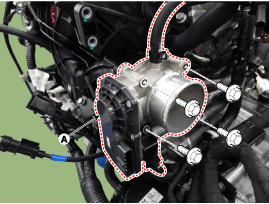
| 6. |
Remove the installation bolts, and then remove the ETC module (A) from the engine.
|
| 7. |
Disconnect the vacuum hose (A).
|
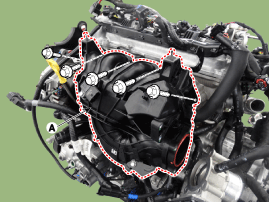
| 8. |
Remove the intake manifold (A) with the gasket.
|

| 9. |
Install in the reverse order of removal. |

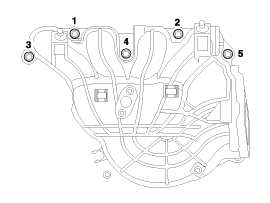
 Exhaust Manifold Components and Components Location
Components 1. Turbo manifold gasket2. Turbo manifold module3. Turbo charger coupler4. Turbo charger coupler & gasket5. Oil feed pipe & hose assembly6...
Other information:
Hyundai Sonata LF 2014-2019 Service Manual: Water pump Troubleshooting
Troubleshooting SymptomsPossible CausesRemedyCoolant leakage • From the bleed hole of the water pump Visually check • Check leaks after about ten-minute warming up. • If coolant still leaks, replace a water pump. • If leakage stops, reuse the water pump (Do not replace the pump with a new one)...
Hyundai Sonata LF 2014-2019 Service Manual: Seat Belt Pretensioner
Seat Belt Pretensioner (BPT) Description and Operation Description The Seat Belt Pretensioners (BPT) are installed inside Center Pillar (LH & RH). When a vehicle crashes with a certain degree of frontal impact, the pretensioner seat belt helps to reduce the severity of injury to the front seat occupants by retracting the seat belt webbing...
Categories
- Manuals Home
- Hyundai Sonata Owners Manual
- Hyundai Sonata Service Manual
- Body (Interior and Exterior)
- Timing System
- Engine And Transmission Assembly
- New on site
- Most important about car
