Hyundai Sonata LF: Indicators And Gauges / Instrument Cluster Description and Operation
Communication Network Diagram
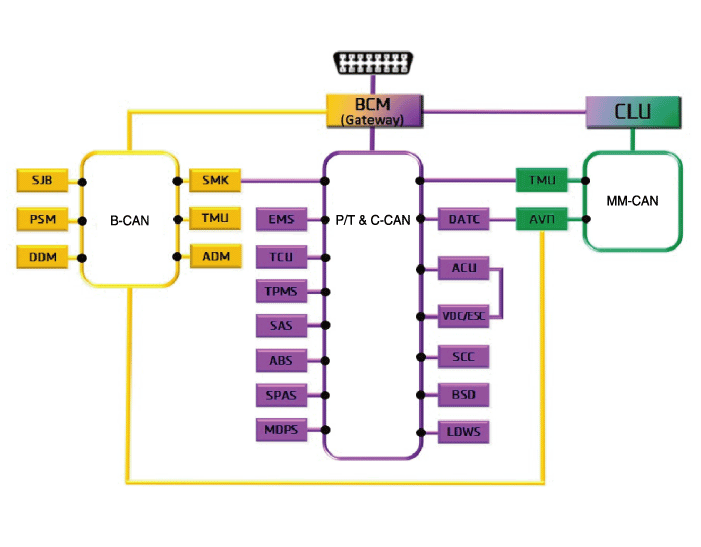
Abbreviation
| Expalnation
|
ACU
| Airbag Control Unit
|
ADM
| Assist Door Module
|
B_CAN
| Body Controller Area Network
|
BCM
| Body Control Module
|
BSD
| Blind Spot Detection
|
C_CAN
| Chassis Controller Area Network
|
CLU
| Cluster Module
|
DATC
| Dual Automatic Temp Control
|
DDM
| Driver Door Module
|
ESC
| Electronic Stability Program
|
EMS
| Engine Management System
|
LDWS
| Lane Departure Warning System
|
M_CAN
| Multi media Controller Area Network
|
MDPS
| Motor Driven Power Steering
|
P_CAN
| Powertrain Controller Area Network
|
PSM
| Power Seat Module
|
SAS
| Steering Angle Sensor
|
SJB
| Smart Junction Block
|
SMK
| Smart Key Unit
|
SPAS
| Smart Parking Assist System
|
TCU
| Transmission Control Unit
|
TPMS
| Tire Pressure Monitoring System
|
VDC
| Vehicle Dynamic Control
|
TMU
| Telematics System
|
ABS
| Anti-lock Brake System
|
SCC
| Smart Cruise Control
|
Cluster Variant Coding
As we have more options (ESC, MDPS, SCC, etc.) in the car,
the dashboard now have more information to display depending on the
chosen options.
For this reason, we need to learn which options the current vehicle when we replace the dashboard.
To address this issue, a course of learning based on the
option required for the vehicle when replacing the dashboard should be
carried out.
This is called Variant Coding.
Function
| 1. |
High speed CAN communication (C-CAN)
| A. |
Custom Function : Boarding interlocking sheets, Welcome Light |
| B. |
LDWS : Lane Departure Warning System |
| C. |
SPAS: Smart Parking Assist System |
|
| 2. |
Low speed CAN communication (MM-CAN)
| A. |
AV : Audio / Video Multimedia information Display |
| B. |
TBT : Turn By Turn Navigation Information Display |
|
| 3. |
Sound output
Instrument cluster and the external speakers connected to the output of the various beeps and sound effects.
If External AMP is applied, the directional alarm is outputted through the amp. 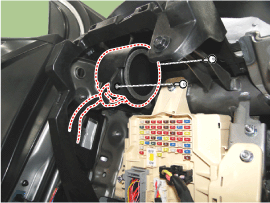
Sound
| Description and function (CAN data receiver)
| Welcome
| Welcome (Key out and door open/closed state checked by BCM)
| Goodbye
| Goodbye (Cluster)
| Door Open warning
| Kwy reminder warning (BCM), Vehicle speed is 5km/h or below
& IGN switch is ACC or IGN or engine start & when vehicle speed
is below 5 km/h or when the driver side door is opened
| Seat belt warning
| Driver seat belt warning (BCM)
| PAS System warning
| PAS sensor fault warning (BCM)
| Gear R
| PAS warning when shift gear R (BCM and SPAS)
| Parking Brake
| Parking brake warning (BCM)
| Start button
| SSB button warning (SMK)
| Rheostat light information
| Rheostat warning when select the max or min degree (Cluster)
| Smart Key departure
| Smart key out warning (SMK)
| N0n smart key warning (SMK)
| Smart Cruise
| Change from the conventional cruise to the smart cruise(SCC)
| Smart cruise driving information
| Smart cruise function cancel (SCC)
| conventional cruise
| Change from the smart cruise to the conventional cruise(SCC)
| Turn signal lamp (Tick)
| Turn signal lamp warning (BCM)
| Turn signal lamp (Tock)
| Turn signal lamp warning (BCM)
| Smart key battery low voltage
| Warnig when driver push the SSB button with low voltage battery smart key (SMK)
| EPB warning
| Warning when change from Auto Hold to EPB lock (EPB)
| Coolant temperature alarm
| When the engine temperature is over 120 °C (EMS)
|
|
| 4. |
User Setting Mode (USM)
Setting can be changed by using switchs (Menu, UP, Down and
OK button). There are many items (for example, In/Out Seat
Synchronization, In/Out Steering Wheel Synchronization, Auto Door Lock,
Auto Door Lock Deactivate, Head Lamp Escort, Welcome Light, Welcome
Sound, One Touch Turn Signal, Average Fuel Consumption Auto Reset,
Brightness, and Content Setup) that can be set and customized. The
signal flow during setting is as follows.
| (1) |
UMS settings are set, they are transmitted to BCM. |
| (2) |
BCM transmits the settings via B_CAN to the relevant modules. |
| (3) |
The module completes setting and transmits the modified setting to BCM. |
| (4) |
BCM transmits the final settings via C_CAN to the cluster.
|
The cluster communicates directly with C-CAN units. |
|
|
Removal
•
Put on gloves to protect your hands.
•
When prying with a flat-tip screwdriver, wrap it with
protective tape, and apply protective tape around the related parts, to
prevent damage...
Other information:
Inspection
Diagnosis with GDS
1.
The body electrocal system can be quickly diagnosed failed parts with vehicle diagnostic system (GDS).
The diagnostic system (GDS) provides the following information.
(1)
Self diagnosis : Checking the failure code (DTC) and display
(2)
Current data : Checking the system input/output data state
(3)
Actuator test : Checking the system operation condition
(4)
Additional function : Other controlling such as he system option and zero point adjustment
2...
Components (1)
1. Dual clutch transmission assembly2. Clutch actuator3. Gear actuator4. Roll rod supprot bracket5. Engine room under cover6. Roll rod bracket7. Dust cover8. Support bracket mounting bolt9. Transmission support bracket
Components (2)
1...


 Instrument Cluster Repair procedures