Hyundai Sonata LF: Front Suspension System / Front Lower Arm Repair procedures
| Replacement |
| 1. |
Raise the vehicle, and make sure it is securely supported. |
| 2. |
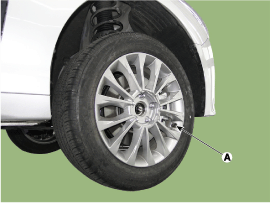
Remove the wheel cap (A).
|


| 3. |
Remove the front wheel and tire (A) from front hub.
|
| 4. |
Remove the lower arm (A).
|
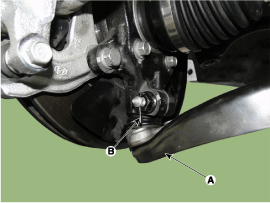
| 5. |
Remove the front lower arm (A) and then loosen the bolts & nuts.
|
| 6. |
Installation is the reverse of removal. |
| Inspection |
| 1. |
Check the bushing for wear and deterioration. |
| 2. |
Check the front stabilizer bar for deformation. |
| 3. |
Check the all bolts and nuts. |
 Front Strut Assembly Repair procedures
Replacement 1. Raise the vehicle, and make sure it is securely supported. 2. Remove the wheel cap (A). Be careful not to damage to the wheel cap (A) when removing the it...
 Front Stabilizer Bar Repair procedures
Inspection 1. Raise the vehicle, and make sure it is securely supported. 2. Remove the wheel cap (A). Be careful not to damage to the wheel cap (A) when removing the it...
Other information:
Hyundai Sonata LF 2014-2019 Service Manual: Front Pillar Trim Components and Components Location
C..
Hyundai Sonata LF 2014-2019 Service Manual: Schematic Diagrams
Schematic [EPB Type] [General Type] Terminal Funtion [EPB Type] PIN NODesciptionCurrentmaxmin1Voltage supply for pump motor39A 10A 2RR EPB motor power30A - 3RR EPB motor ground30A - 4- - - 5Local CAN High 30mA 20mA 6Electric parking brake signal 1 20mA - 7Electric parking brake signal 220mA - 8Electric parking brake signal 320mA - 9Electric parking brake signal 420mA - 10- - - 11- - - 12RL EPB motor ground30A - 13RL EPB motor power30A - 14Ground for solenoid valves and ECU30A 10A 15- - - 16ESS200mA 100mA 17FR Wheel speed sensor signal16...
Categories
- Manuals Home
- Hyundai Sonata Owners Manual
- Hyundai Sonata Service Manual
- Cooling System
- Audio
- Timing System
- New on site
- Most important about car
