Hyundai Sonata LF: Intake And Exhaust System / Exhaust Manifold Repair procedures
| 1. |
Remove the engine cover. |
| 2. |
Disconnect the battery negative terminal. |
| 3. |
Remove the air cleaner assembly. (Intake And Exhaust System - "Air Cleaner") |
| 4. |
Remove the front muffler. (Intake And Exhaust System - "Muffler") |
| 5. |
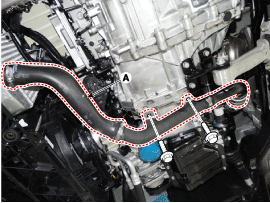
Remove the intercooler inlet hoses & pipe (A).
Tightening torque
Bolt :
19.6 ~ 26.4 N.m (2.0 ~ 2.7 kgf.m, 14.4 ~ 19.5 lb-ft)
Clamp :
4.9 ~ 6.8 N.m (0.5 ~ 0.7 kgf.m, 3.6 ~ 5.0 lb-ft)
|
|
| 6. |
Remove the turbo charger actuator solenoid valve(A). 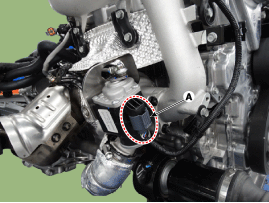
|
| 7. |
Remove the intake pipe stay(A).
Tightening torque
M8 Bolt :
18.6 ~ 23.5 N.m (1.9 ~ 2.4kgf.m, 13.7 ~ 17.4 lb-ft)
M10 Bolt :
29.4 ~ 34.3 N.m (3.0 ~ 3.5kgf.m, 21.6 ~ 25.3 lb-ft)
|
|
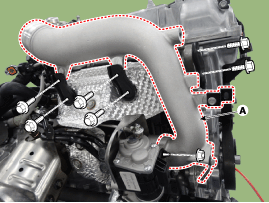
| 8. |
Remove the intake pipe(B) and gasket.
Tightening torque
Bolt :
29.4 ~ 39.2N.m (3.0 ~ 4.0 kgf.m, 21.6 ~ 28.9 lb-ft)
Nut :
35.3 ~ 41.1 N.m (3.6 ~ 4.2 kgf.m, 26.0 ~ 30.3 lb-ft)
|
|
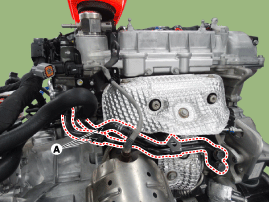
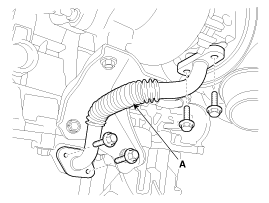
| 9. |
Remove the turbo charger water pipe & hose(A).
Tightening torque
Flange Bolt :
9.8 ~ 11.8N.m (1.0 ~ 1.2 kgf.m, 7.2 ~ 8.7 lb-ft)
Eye Nut :
26.4 ~ 32.3 N.m (2.7~ 3.3 kgf.m, 19.5 ~ 32.3 lb-ft)
|
|
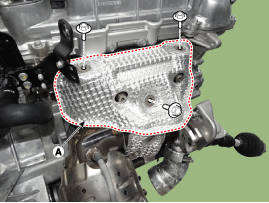
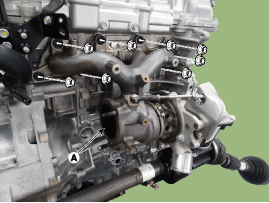
| 10. |
Remove the turbo manifold module heat protect(A).
Tightening torque :
9.8 ~ 11.8N.m (1.0 ~ 1.2 kgf.m, 7.2 ~ 8.7 lb-ft)
|
|
When installing, temporarily tighten the bolt and then completely tighten to specified torque. |
|
| 11. |
Remove the turbo DPF(A).

|
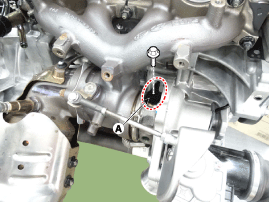
| 12. |
Remove the turbo charger oil feed pipe(A).
Tightening torque
M6 Bolt :
9.8 ~ 11.8N.m (1.0 ~ 1.2 kgf.m, 7.2 ~ 8.7 lb-ft)
Eye Nut :
11.8 ~ 17.6 N.m (1.2 ~ 1.8 kgf.m, 8.7 ~ 41.1 lb-ft)
|
|
When installing, completely remove the oil from assembly part and be careful not to enter any dust.
When installing the eye bolt, be careful to not contact with the stopper to the compressor housing. |
|
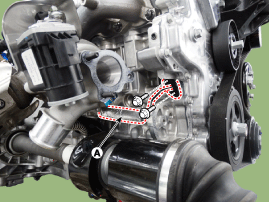
| 13. |
Remove the turbo charger oil drain pipe(A).
Tightening torque :
9.8 ~ 11.8N.m (1.0 ~ 1.2 kgf.m, 7.2 ~ 8.7 lb-ft
|
|
When installing, completely remove the oil from assembly part. |
|
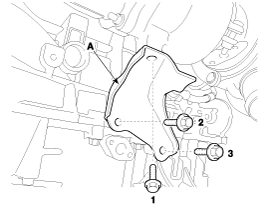
| 14. |
Remove the turbo charger stay(A).
Tightening torque :
49.0 ~ 53.9N.m (5.0 ~ 5.5 kgf.m, 36.1 ~ 39.7 lb-ft)
|
|
When installing, temporarily tighten the bolt in picture order and completely tighten the bolt as specified torque in order. |
|
| 15. |
Remove the turbo manifold module(A) and gasket.
Tightening torque :
35.3 ~ 41.1N.m (3.6 ~ 4.2 kgf.m, 26.0 ~ 30.3 lb-ft)
|
|
When installing, you should assemble it toward the coating side(black).
When installing, temporarily tighten the nut in picture order and completely tighten the bolt as specified torque in order. 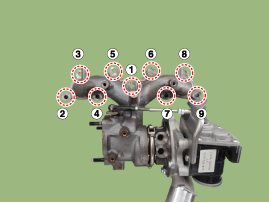
|
|
| 16. |
Install in the reverse order of removal.
|
When installing, replace with a new gasket.
If the oil feed pipe and hose is damaged, the turbocharger
could be damaged because turbocharger oil supply is not good. Be careful
to not crush. |
|
Components
1. Turbo manifold gasket2. Turbo manifold module3. Turbo charger coupler4. Turbo charger coupler & gasket5. Oil feed pipe & hose assembly6...
Components
1. Intercooler air guard2. Intercooler3. Intercooler outlet hose4. Intercooler inlet hose & pipe5. Intercooler upper mounting bracket6...
Other information:
Troubleshooting
SymptomsPossible CausesRemedyCoolant leakage
•
From the thermostat gasket
Check the mounting bolts
•
Check the torque of the mounting bolts
•
Retighten the bolts and check leakage again.
Check the gasket for damage
•
Check gasket or seal for damage
•
Replace gaskets and reuse the thermostat...
Removal
1.
Disconnect the negative (-) battery terminal.
2.
Remove the driver crash pad lower panel.
(Refer to Body - "Crash Pad Lower Panel")
3.
Remove the knee airbag module.
(Refer to Restraint - "Knee Airbag (KAB) Module")
4.
Disconnect the connector of the immobilizer unit and then remove the immobilizer unit (A) after loosening a nut...


 Exhaust Manifold Components and Components Location
 Intercooler Components and Components Location