Hyundai Sonata LF: Cylinder Head Assembly / CVVT & Camshaft Repair procedures
| 1. |
Remove the cylinder head cover.
(Refer to Cylinder Head Assembly - "Cylinder Head Cover") |
| 2. |
Turn the crankshaft damper pulley so that No. 1 piston is at top dead center.
| (1) |
Turn the crankshaft damper pulley and align its groove with
the timing mark on the timing chain cover (0° mark on the timing
scale). 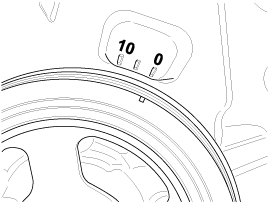
|
| (2) |
Check that the TDC timing marks on the intake and exhaust
CVVT sprockets are in a straight line on the cylinder head surface as
shown in the picture. If not, turn the crankshaft damper pulley by one
revolution (360°). 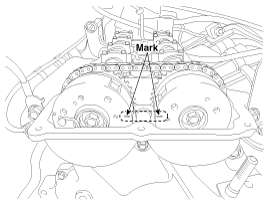
|
Do not turn the crankshaft damper pulley counterclockwise. |
|
| (3) |
Mark the timing chain links corresponding to the timing marks on the CVVT sprockets with a indelible marker. 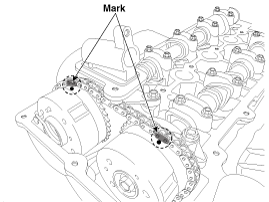
|
|
| 3. |
Remove the exhaust oil control valve (OCV) adaptor (A). 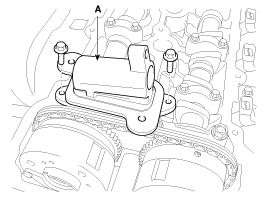
|
| 4. |
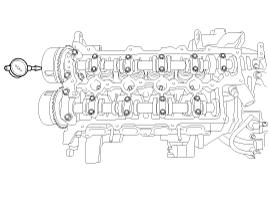
Remove the camshaft bearing caps (A) in the order shown in the picture. 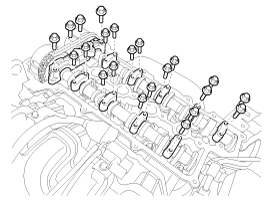
|
| 5. |
Remove the engine mounting support bracket.
| (1) |
Put a jack under the oil pan.
|
Place a wooden block between the jack and the oil pan to prevent damage to the oil pan. |
|
| (2) |
Disconnect the engine ground cable (A). 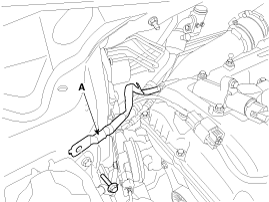
|
| (3) |
Remove the engine mounting support bracket (A). 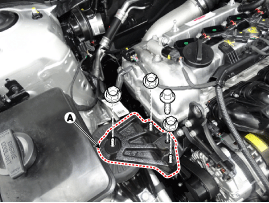
|
| (4) |
Lift the engine slightly using the jack to obtain space for releasing the timing chain tensioner. |
|
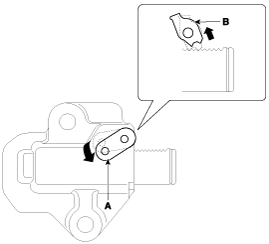
| 6. |
Remove the bolt (A) from the service hole in the timing chain cover. 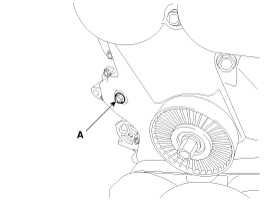
|
| 7. |
Lock the timing chain tensioner in the fully retracted position.
| (1) |
Insert a pick into the service hole in the timing chain cover
and lower the hole in the left side of the ratchet plate (A) on the
tensioner to allow the pawl (B : located inside the tensioner behind the
rachet plate) to be lifted. 
|
| (2) |
With the pawl lifted, have a helper pull up the exhaust CVVT
& camshaft (A) to allow the tensioner plunger (B) to retract.
|
| (3) |
With the tensioner plunger in the fully retracted position,
raise the hole in the left side of the ratchet plate (A) again through
the service hole in the chain cover to align the ratchet plate hole with
the hole in the tensioner body behind the ratchet plate, then lock the
tensioner by inserting the pick through the ratchet plate and tensioner
body holes. 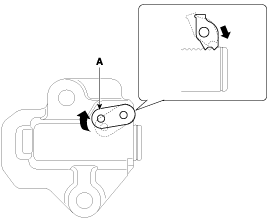
|
|
| 8. |
Separate the exhaust camshaft (A) from the exhaust CVVT by removing the bolt. 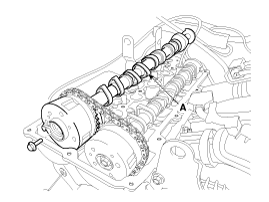
|
| 9. |
Remove the exhaust CVVT (A) from the timing chain. 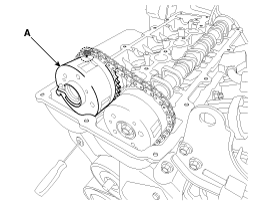
|
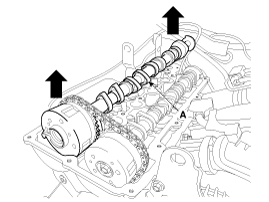
| 10. |
Remove the intake CVVT & camshaft (A). 
|
Fasten the timing chain to the engine hanger with a cable tie
or strap not to allow the timing chain to fall down when removing the
intake CVVT & camshaft. 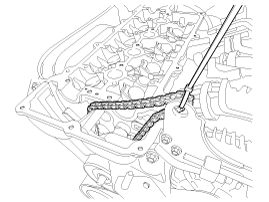
|
|
| 11. |
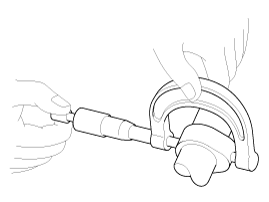
Remove the intake CVVT (A) from the intake camshaft (B). 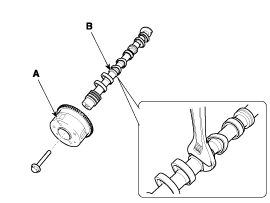
|
When removing the CVVT bolt, hold the hexagonal portion (B) on the camshaft with a wrench to prevent the camshaft from rotating. |
|
Camshaft
| 1. |
Measure the height of the cam lobe using a micrometer and
check the surface of the cam lob for wear and tear. If necessary,
replace the camshaft.
Cam height
Intake : 44.15 mm (1.738 in.)
Exhaust : 43.55 mm (1.715 in.)
|
|
| 2. |
Check the surface of the camshaft journal for wear and tear.
If the camshaft journal is excessively damaged, replace the camshaft. |
| 3. |
Inspect the camshaft journal clearance.
| (1) |
Clean the camshaft journals and bearing caps. |
| (2) |
Place the camshafts in the cylinder head. |
| (3) |
Lay a strip of plastigauge across each of the camshaft journals. 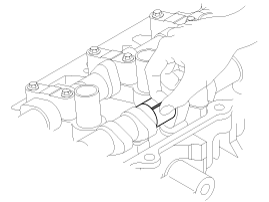
|
| (4) |
Install the bearing caps and tighten the bolts to the specified torque.
Tightening torque
1st step
M6 bolt : 5.9 N.m (0.6 kgf.m, 4.3 lb-ft)
M8 bolt : 9.8 N.m (1.0 kgf.m, 7.2 lb-ft)
2nd step
M6 bolts :
11.8 ~ 13.7N.m (1.2 ~ 1.4kgf.m, 8.7 ~ 10.1lb-ft)
M8 bolts :
18.6 ~ 22.6N.m (1.9 ~ 2.3kgf.m, 13.7 ~ 16.6lb-ft)
|
|
Do not turn the camshaft. |
|
| (5) |
Remove the bearing caps. |
| (6) |
Measure the plastigauge at the widest point. If the clearance
is greater than the specification, replace the camshaft. If necessary,
replace the bearing caps and the cylinder head as a set.
Camshaft bearing cap oil clearance
Standard :
0.027 ~ 0.058 mm (0.0011 ~ 0.0023 in.)
Limit : 0.1 mm (0.0039 in.)
|
|
|
| 4. |
Inspect the camshaft end play.
| (1) |
Inspect the camshaft end play. |
| (2) |
Measure the end play while moving the camshaft back and forth
using a dial gauge. If the end play is greater than the specification,
replace the camshaft. If necessary, replace the bearing caps and the
cylinder head as a set.
Camshaft end play
Standard : 0.1 ~ 0.2 mm (0.0039 ~ 0.0079 in.)
|
|
| (3) |
Remove the camshafts. |
|
CVVT (Continuously Variable Valve Timing) Assembly
| 1. |
Inspect the CVVT for smooth rotation.
| (1) |
Clamp the camshaft using a vise. Be careful not to damage the cam lobes and journals in the vise. |
| (2) |
Check that the CVVT is locked by turning it clockwise or counterclockwise. It must not rotate. |
| (3) |
Intake CVVT : Seal one of the two advance holes in the camshaft journal with tape.
Exhaust CVVT : Seal one of the two retard holes in the camshaft journal with tape. 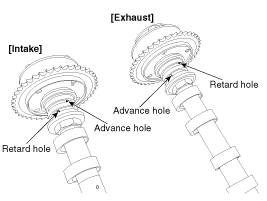
|
| (4) |
Intake CVVT : Apply approx. 150 kPa (1.5 kgf/cm?, 21 psi )
of compressed air into the unsealed advance hole to release the lock.
Exhaust CVVT : Apply approx. 150 kPa (1.5 kgf/cm?, 21 psi )
of compressed air into the unsealed retard hole to release the lock.
|
Cover the oil paths with a piece of cloth when applying compressed air to prevent oil from spraying. |
|
| (5) |
Intake CVVT : With compressed air applied, rotate the CVVT
into the advance direction (counterclockwise) within its phasing range
and check that the CVVT turns smoothly.
Exhaust CVVT : With compressed air applied, rotate the CVVT
into the retard direction (clockwise) and check that the CVVT turns
smoothly.
CVVT phasing range
Intake : 25°±1° (from the most retarded position to the most advanced position)
Exhaust : 20°±1° (from the most advanced position to the most retarded position)
|
|
| (6) |
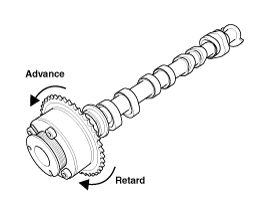
Intake CVVT : Rotate the CVVT into the most retarded position (clockwise) and then check that the CVVT is locked.
Exhaust CVVT : Rotate the CVVT into the most advanced position (counterclockwise) and then check that the CVVT is locked. |
|
| 1. |
Install the intake CVVT (A) to the intake camshaft.
Tightening torque :
63.7 ~ 73.5 N.m (6.5 ~ 7.5 kgf.m, 47.0 ~ 54.2 lb-ft)
|
|
When installing the CVVT bolt, hold the hexagonal portion (B)
on the camshaft with a wrench to prevent the camshaft from rotating. |
|
| 2. |
Install the intake CVVT & camshaft (A), with the timing
mark on the intake CVVT sprocket aligned with the mark (painted link) on
the timing chain.
|
| 3. |
Install the exhaust CVVT (A), with the timing mark on the
exhaust CVVT sprocket aligned with the mark (painted link) on the timing
chain.
|
| 4. |
Install the exhaust camshaft (A) to the exhaust CVVT.
Tightening torque :
63.7 ~ 73.5 N.m (6.5 ~ 7.5 kgf.m, 47.0 ~ 54.2 lb-ft)
|
|
| 5. |
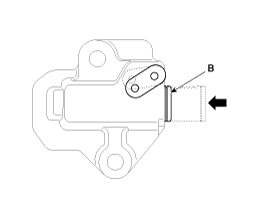
Remove the pick from the service hole in the timing chain cover. 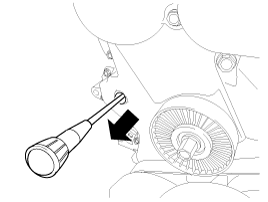
|
| 6. |
Check that each timing mark of the intake and exhaust CVVT sprockets is aligned as shown in the picture. 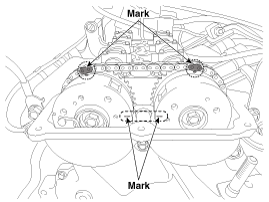
|
| 7. |
Install the bolt (A) to the service hole in the timing chain cover.
Tightening torque :
27.5 ~ 30.4 N.m (2.8 ~ 3.1 kgf.m, 20.3 ~ 22.4 lb-ft)
|
|
| 8. |
Install the engine mounting support bracket.
| (1) |
Install the engine mounting support bracket (A).
Tightening torque
88.3 ~ 107.9 N.m (9.0 ~ 11.0 kgf.m, 65.1 ~ 79.6 lb-ft)
|
|
| (2) |
Connect the engine ground cable (A).
Tightening torque :
10.8 ~ 13.7 N.m (1.1 ~ 1.4 kgf.m, 8.0 ~ 10.1 lb-ft)
|

|
| (3) |
Remove the jack from the oil pan. |
|
| 9. |
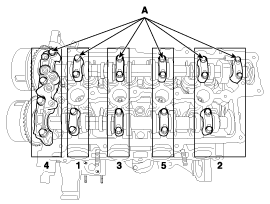
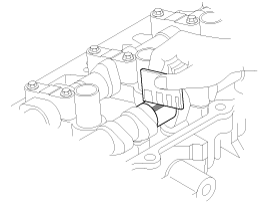
Install the camshaft bearing caps (A) in the order shown in the picture and tighten the bolts to the specified torque.
Tightening torque
1st step
M6 bolt : 5.9 N.m (0.6 kgf.m, 4.3 lb-ft)
M8 bolt : 9.8 N.m (1.0 kgf.m, 7.2 lb-ft)
2nd step
M6 bolts :
11.8 ~ 13.7N.m (1.2 ~ 1.4kgf.m, 8.7 ~ 10.1lb-ft)
M8 bolts :
18.6 ~ 22.6N.m (1.9 ~ 2.3kgf.m, 13.7 ~ 16.6lb-ft)
|

|
| 10. |
Install the exhaust oil control valve (OCV) adaptor (A).
Tightening torque :
9.8 ~ 11.8 N.m (1.0 ~ 1.2 kgf.m, 7.2 ~ 8.7 lb-ft)
|
|
Check that the front camshaft bearing cap O-ring is properly seated in place when installing the OCV adaptor. |
|
| 11. |
Install the cylinder head cover.
(Refer to Cylinder Head Assembly - "Cylinder Head Cover") |
Description
Continuous Variable Valve Timing (CVVT) system advances or
retards the valve timing of the intake and exhaust valve in accordance
with the ECM control signal which is calculated by the engine speed and
load...
Components
1. Cylinder head assembly2. MLA3. Retainer lock4. Retainer 5. Valve stem seal6. Valve spring7. Valve spring seat8. OCV (Oil Control Valve)9...
Other information:
Inspection
Front Seat Heater
1.
Check for continuity and measure the resistance between terminals No 3 and No 6.
Standard value
Driver / Assists (cushion + back) : 1.58±10%
2.
Operate the seat heater after connecting the connector, and
then check the thermostat by measuring the temperature of seat surface...
S..


 CVVT & Camshaft Description and Operation
 Cylinder Head Components and Components Location