Hyundai Sonata LF: Crash Pad / Crash Pad Garnish Assembly [RH] Repair procedures

Hyundai Sonata LF 2014-2019 Service Manual / Body (Interior and Exterior) / Crash Pad / Crash Pad Garnish Assembly [RH] Repair procedures

Replacement
   
•
When prying with a flat-tip screwdriver or use a prying trim tool, wrap it with protective tape, and apply protective tape around the related parts, to prevent damage.
•
Use a plastic panel removal tool to remove interior trim pieces to protect from marring the surface.
•
Take care not to bend or scratch the trim and panels.
1.
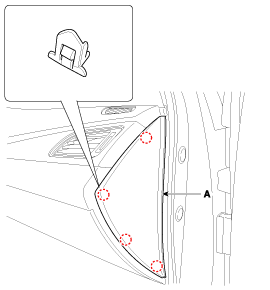
Using a screwdriver or remover, remove the crash pad side cover [RH] (A).

2.
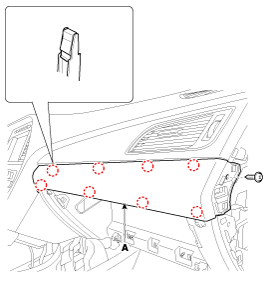
After loosen the mounting screws, remove the crash pad passenger side garnish (A).

3.
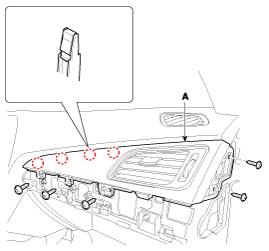
After loosening the mounting screw, then remove the crash pad garnish assembly [RH] (A).

4.
Install in the reverse order of removal.
   
•
Replace any damage clips.

    Crash Pad Garnish Assembly [RH] Components and Components Location

    C..

    Crash Pad Lower Panel Components and Components Location

    C..

    Other information:

    Hyundai Sonata LF 2014-2019 Service Manual: CVVT & Camshaft Description and Operation


    Description Continuous Variable Valve Timing (CVVT) system advances or retards the valve timing of the intake and exhaust valve in accordance with the ECM control signal which is calculated by the engine speed and load. By controlling CVVT, the valve over-lap or under-lap occurs, which makes better fuel economy and reduces exhaust gases (NOx, HC) and improves engine performance through reduction of pumping loss, internal EGR effect, improvement of combustion stability, improvement of volumetric efficiency, and increase of expansion work...

    Hyundai Sonata LF 2014-2019 Service Manual: Ignition Coil Repair procedures


    Removal 1. Turn ignition switch OFF and disconnect the negative (-) battery cable. 2. Remove the engine cover. 3. Disconnect the ignition coil connector (A). 4. Remove the ignition coil (A).     • When removing the ignition coil connector, pull the lock pin (A) and push the clip (B)...

    Categories

    read more

     
    Copyright © 2026 www.hsonatalf.org