
Hyundai Sonata LF: Evaporative Emission Control System / Canister Repair procedures
| Removal |
| 1. |
Turn the ignition switch OFF and disconnect the negative (-) battery cable. |
| 2. |
Remove the fuel tank.
(Refer to Engine Control / Fuel System - " Fuel Tank") |
| 3. |
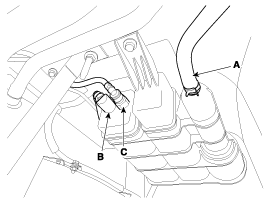
Disconnect the vent hose (A). |
| 4. |
Disconnect the vapor tube quick-connector (B,C).
|
| 5. |
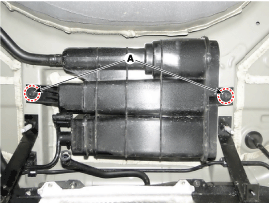
Remove installation bolts (A) and then remove the canister assembly.
|
| Inspection |
| 1. |
Check for the following items visually.
A: Canister - Atmosphere
B: Canister - Fuel Tank
C: Canister - Intake Manifold
|
| Installation |
| 1. |
Install in the reverse order of removal. |
 Repair procedures
Inspection [System Inspection] 1. Disconnect the vapor hose from the intake manifold and connect a vacuum pump to the nipple on the intake manifold...
 Fuel Filler Cap Description and Operation
Description A ratchet tightening device on the threaded fuel filler cap reduces the chances of incorrect installation, which would seal the fuel filler...
Other information:
Hyundai Sonata LF 2014-2019 Service Manual: Fuel Pressure Sensor (FPS) Description and Operation
Description The fuel pressure sensor (FPS) is installed on the top of the low pressure fuel pump and measures the pressure in the low pressure fuel line. Based on the fuel pressure measured by the FPS and the amount of fuel consumed, the fuel pump control module (FPCM) determines whether to activate the low pressure fuel pump...
Hyundai Sonata LF 2014-2019 Service Manual: Repair procedures
Operation and Leakage Check Check all of the following items: ComponentProcedureBrake Booster (A)Check brake operation by applying the brakes during a test drive. If the brakes do not work properly, check the brake booster. Replace the brake booster as an assembly if it does not work properly or if there are signs of leakage...
Categories
- Manuals Home
- Hyundai Sonata Owners Manual
- Hyundai Sonata Service Manual
- Front Driveshaft Repair procedures
- General Information
- Emission Control System
- New on site
- Most important about car
