Hyundai Sonata LF: Engine Control System / Canister Close Valve (CCV) Repair procedures
Hyundai Sonata LF 2014-2019 Service Manual / Engine Control / Fuel System / Engine Control System / Canister Close Valve (CCV) Repair procedures
| Inspection |
| 1. |
Turn the ignition switch OFF. |
| 2. |
Disconnect the CCV connector. |
| 3. |
Measure resistance between the CCV terminal 1 and 2. |
| 4. |
Check that the resistance is within the specification.
|
| 5. |
Disconnect the vapor hose connected with the canister from the CCV. |
| 6. |
Connect a vacuum pump to the nipple. |
| 7. |
Ground the CCV control line and apply battery voltage to the CCV power supply line. |
| 8. |
Apply vacuum and check the valve operation.
|
| Removal |
| 1. |
Turn the ignition switch OFF and disconnect the battery negative (-) cable. |
| 2. |
Lift the vehicle. |
| 3. |
Remove the rear-left wheel & tire and the wheel house cover. |
| 4. |
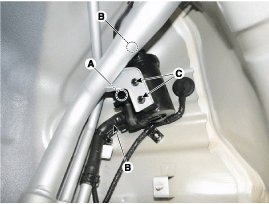
Disconnect the canister close valve connector (A). |
| 5. |
Disconnect the ventilation hose (B) connected to the fuel tank air filter and canister close valve. |
| 6. |
Remove the fuel tank air filter after removing the installation bolt (C).
|
| 7. |
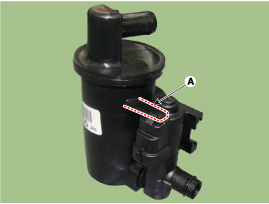
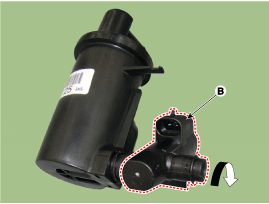
Release the lever (A), and then rotate the canister close valve (B) in the direction of an arrow. |
| 8. |
Remove the canister close valve from the fuel tank air filter.
|
| Installation |
|

| 1. |
Installation is reverse of removal. |


Other information:
Hyundai Sonata LF 2014-2019 Service Manual: Door Mood Lamp Repair procedures
Removal 1. Disconnect the negative (-) battery terminal. 2. Remove the front door trim. (Refer to Body - "Front Door Trim") 3. Disconnect the door mood lamp connector. 4. Remove the door mood lamp (A). Installation 1. Install the door mood lamp and connector...
Hyundai Sonata LF 2014-2019 Service Manual: General Information
General 1. Basically, all measurements in this manual are taken with a tracking gauge. 2. When a measuring tape is used, check to be sure there is no elongation, twisting or bending. 3. For measuring dimensions, both projected dimension and actual-measurement dimension are used in this manual...
Categories
- Manuals Home
- Hyundai Sonata Owners Manual
- Hyundai Sonata Service Manual
- Heating, Ventilation and Air Conditioning
- Cooling System
- Engine Electrical System
- New on site
- Most important about car

Copyright © 2026 www.hsonatalf.org