Hyundai Sonata LF: Advanced Smart Cruise Control System / Advanced Smart Cruise Control (ASCC) Unit-Radar Repair procedures
Hyundai Sonata LF 2014-2019 Service Manual / Engine Electrical System / Advanced Smart Cruise Control System / Advanced Smart Cruise Control (ASCC) Unit-Radar Repair procedures
| Removal |
| 1. |
Remove the bumper.
(Refer to Body - "Front Bumper") |
| 2. |
Disconnect the smart cruise control unit connector. |
| 3. |
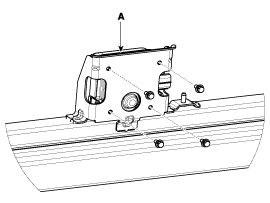
Remove the smart cruise control unit assembly (A) from vehicle after loosening mounting bolts.
|
| Installation |
| 1. |
Install in the reverse order of removal. |
| 2. |
Align the smart cruise control sensor.
("Advanced Smart Cruise Control (ASCC) Alinment" ) |
| 3. |
Install the bumper cover.
(Refer to Body - "Front Bumper Cover") |
| Advanced Smart Cruise Control (ASCC) Rader Sensor Alignment |
The objective of the alignment is to ensure correct SCC
performance. In order for the sensor to perform correctly, the sensor
must be aligned correctly. The sensor alignment has major impact on road
estimation, lane prediction, and target processing. When the sensor is
misaligned, the performance of SCC cannot be guaranteed. Therefore, when
the sensor is reinstalled or a new sensor is installed on a vehicle,
the sensor shall be aligned by service personnel.
The sensor must be aligned when;
|

The sensor can not recognize a vehicle ahead.
|

Advanced Smart Cruise Control (SCC) Radar Sensor Alignment
| 1. |
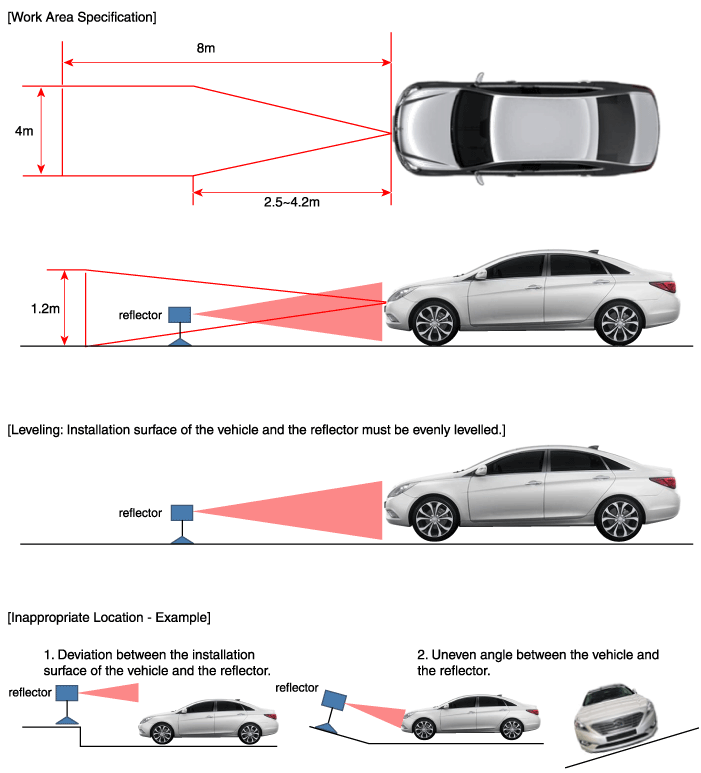
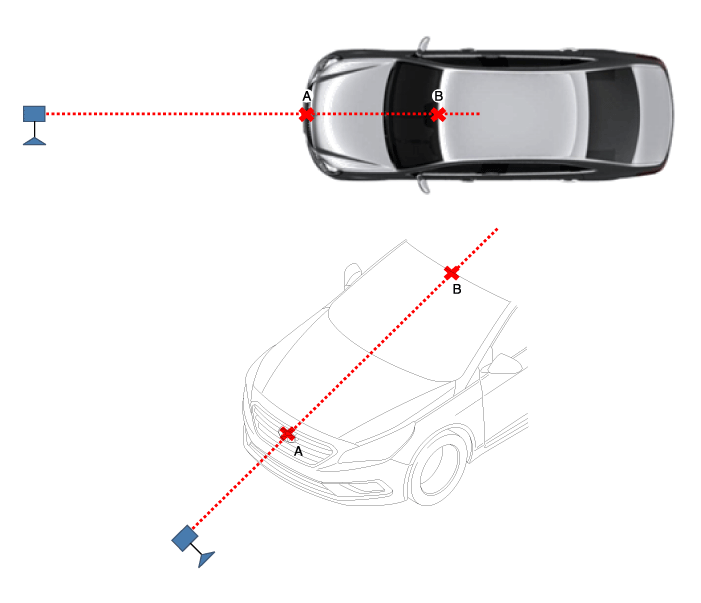
Stop the vehicle horizontally at a flat place.
|
| 2. |
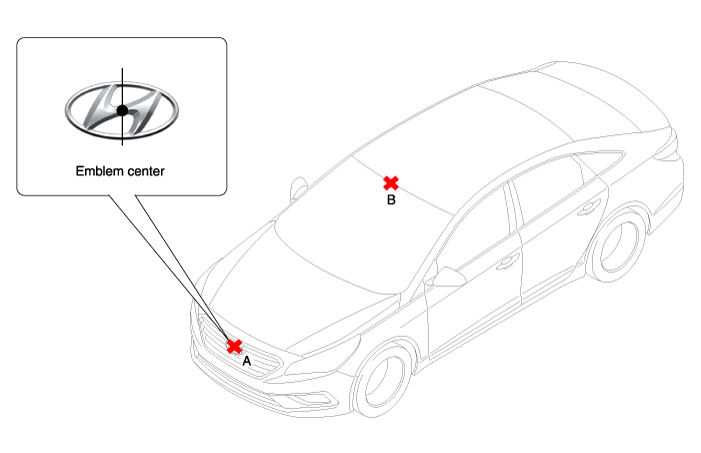
Mark the center point of emblem (A) and the center point on top of wind glass (B).
|
| 3. |
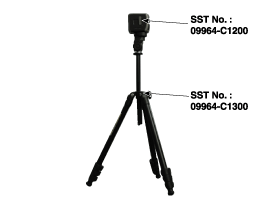
Connect the ASCC Calibration beam (SST No. : 09964-C1200) to the Tri-Pod (SST No. : 09964-C1300).
|
| 4. |
Match the vertical line of laser to (A) and (B) using the ASCC calibration beam pointer.
|
| 5. |
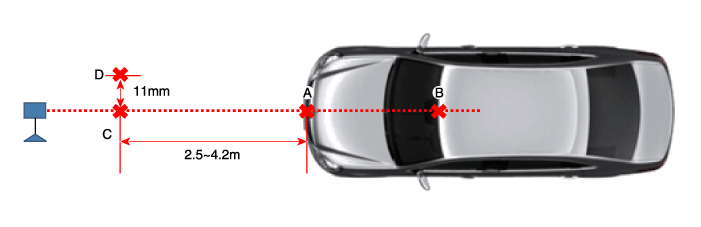
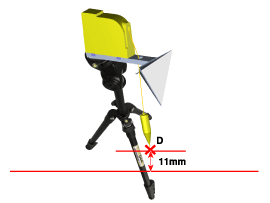
Mark (C) located in 2.5~4.2 m from (A) in front of the vehicle. |
| 6. |
Mark (D) at the place which is 11 mm away from (C) to the left in vertical direction.
|
| 7. |
Disconnect the ASCC Calibration beam (SST No. : 09964-C1200) from the Tri-Pod (SST No. : 09964-C1300). |
| 8. |
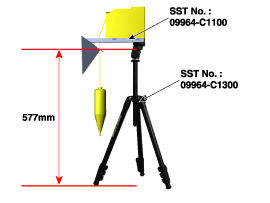
Connect the reflector(SST No. : 09964-C1100) to the tripod(SST No. : 09964-C1300) and set the reflector center height to 577 mm.
|
| 9. |
Set the reflector horizontal using the leveler which is built in the tripod(SST No. : 09964-C1300).
|
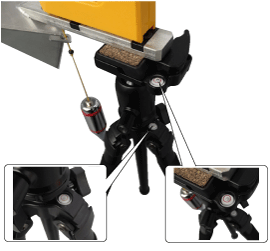
| 10. |
Set SST (reflector or tripod) to match the position of SST (reflector) to the position of (D).
|
| 11. |
Check again the radar sensor and the surface of front bumper for the following items with the eyes.
|
| 12. |
Connect the GDS to the DLC of the vehicle and start sensor alignment.
|
| 13. |
After correctly selecting the vehicle model, select "SCC Alignment" from the auxiliary functions in GDS Menu.
|
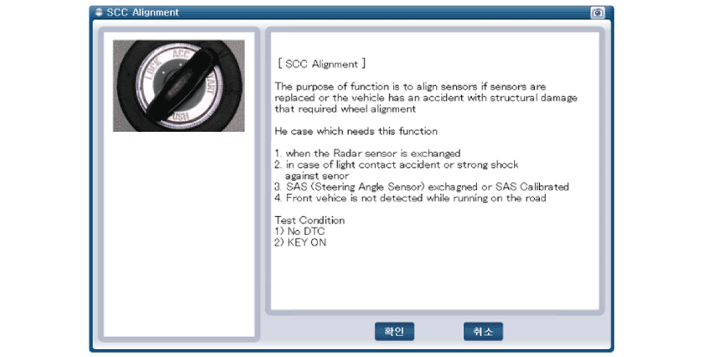
| 14. |
Perform sensor alignment by following the directions shown in the GDS monitor.
|
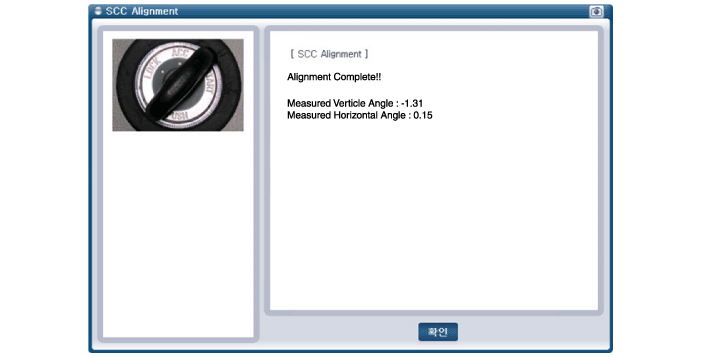
| 15. |
In case of sensor alignment failure, check the alignment
conditions. Turn the ignition key OFF, then reperform the sensor
alignment procedure. |


Other information:
Hyundai Sonata LF 2014-2019 Service Manual: Canister Close Valve (CCV) Repair procedures
Inspection 1. Turn the ignition switch OFF. 2. Disconnect the CCV connector. 3. Measure resistance between the CCV terminal 1 and 2. 4. Check that the resistance is within the specification. Specification: Refer to "Specification" 5...
Hyundai Sonata LF 2014-2019 Service Manual: Knee Airbag (KAB) Module Description and Operation
Description The Knee Airbag (KAB) is installed inside the crash pad lower panel and protects the driver in the event of a frontal crash. The SRSCM determines if and when to deploy the KAB. Never attempt to measure the circuit resistance of the airbag module (squib) even if you are using a specified tester...
Categories
- Manuals Home
- Hyundai Sonata Owners Manual
- Hyundai Sonata Service Manual
- Brake System
- Cooling System
- DCT (Dual Clutch Transmission) System
- New on site
- Most important about car

Copyright © 2026 www.hsonatalf.org