Hyundai Sonata LF: Fuel Delivery System / Fuel Pressure Sensor (FPS) Repair procedures
| Inspection |
| 1. |
Connect the GDS on the Data Link Connector (DLC). |
| 2. |
Check the output voltage of fuel pressure sensor (FPS).
|
| Removal |
| 1. |
Turn the ignition seitch OFF and disconnect the battery negative (-) cable. |
| 2. |
Remove the rear seat cushion.
( Refer to Body - "Rear Seat Assembly" ) |
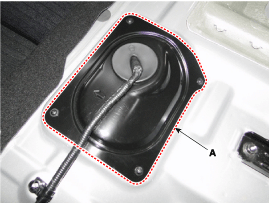
| 3. |
Remove the fuel pump sservice cover (A).
|
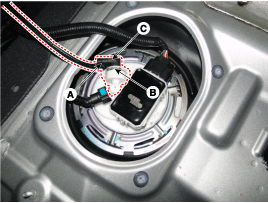
| 4. |
Disconnect the fuel pressure sensor connector (A). |
| 5. |
Remove the fuel pressure sensor fixing pin (B). |
| 6. |
Remove the fuel pressure sensor (C) from the fuel pump.
|
| Installation |
| 1. |
Install in the reverse order of removal. |
 Fuel Pressure Sensor (FPS) Schematic Diagrams
Circuit Diagram Fail-Safe Mode Item Fail-Safe Output Voltage (V) 12 If the fuel pressure sensor malfunctions, it enters fail safe mode...
 Fuel Line Repair procedures
Removal Whenever the high pressure fuel pump, fuel pipe, deliverypipe, or injector is removed immediately after shutting offthe engine, an injury may be caused by the release ofhighly pressurized fuel...
Other information:
Hyundai Sonata LF 2014-2019 Service Manual: Description and Operation
System Overview RPAS (Rear Parking Assist System) is an electronic driving aid that warns the driver to be cautious while parking or in low speed environments. The sensor uses ultrasonic waves to detect objects within proximity of the vehicle...
Hyundai Sonata LF 2014-2019 Service Manual: Description and Operation
Description Body Control Module (BCM) Function NoItemDescription1Washer Linked Wiper - If the washer switch is pressed ON for 0.06~0.2 second with the vehicle mode in IGN2, the wiper relay is turned ON 0.3┬▒0.1 second after washer switch ON, and then the wiper relay is turned OFF 0...
Categories
- Manuals Home
- Hyundai Sonata Owners Manual
- Hyundai Sonata Service Manual
- Brake System
- Cooling System
- Engine Control / Fuel System
- New on site
- Most important about car
