Hyundai Sonata: Front Seat / Front Seat Assembly Repair procedures
Hyundai Sonata LF 2014-2019 Service Manual / Body (Interior and Exterior) / Front Seat / Front Seat Assembly Repair procedures
| Replacement |
|

| 1. |
Remove the front anchor seat belt.
(Refer to Restraint - "EFD (Emergency Fastening Device) System") |
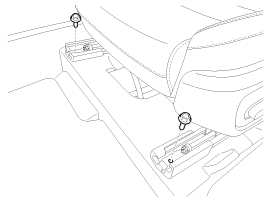
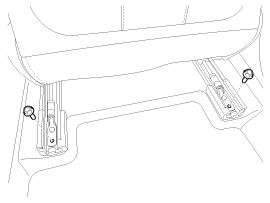
| 2. |
After loosening the mounting bolts, remove the front seat assembly.
[Front]
[Rear]
|
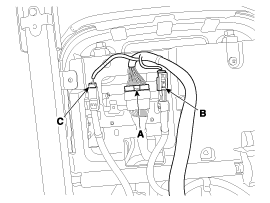
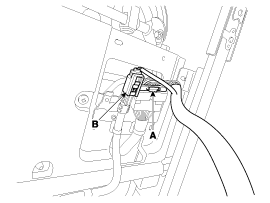
| 3. |
Disconnect the main connector (A), side airbag connector (B), front seat belt buckle connector (C).
[Driver's]
[Passenger's]
|
| 4. |
Install in the reverse order of removal.
|

 Front Seat Assembly Components and Components Location
Component Location
1. Front seat assembly
...
 Front Seat Outer Shield Cover Components and Components Location
Component Location
1. Front seat outer shield cover
...
Other information:
Hyundai Sonata LF 2014-2019 Owners Manual: Malfunction Indicator Lamp (MIL)
This warning light illuminates:
Once you set the ignition switch or Engine Start/Stop button to the ON position.
- It remains on until the engine is started.
When there is a malfunction with the emission control system. In this case,
have your vehicle inspected by an authorized HYUNDAI dealer ...
Hyundai Sonata LF 2014-2019 Service Manual: Rear Door Latch Components and Components Location
Component Location
1. Rear door latch
...
© 2018-2025 www.hsonatalf.org
