Hyundai Sonata LF: Rear Door / Rear Door Latch Repair procedures
| Replacement |
| 1. |
Remove the rear door module.
(Refer to Rear Door - "Rear Door Module") |
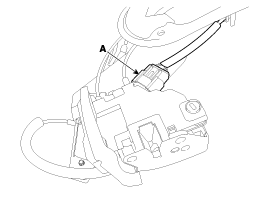
| 2. |
Disconnect the rear door latch connector (A).
|
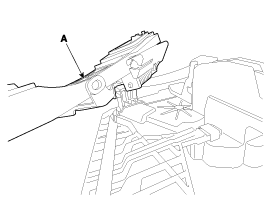
| 3. |
Remove the rear door inside handle cage (A).
|

| 4. |
Remove the rear door inside handle cable (A) by pushing it rearward.
|

| 5. |
Remove the rear door outside handle base (A) by pushing in the lock pins located in the back.
|
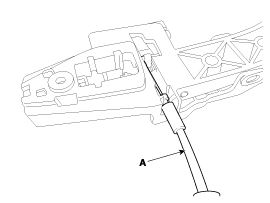
| 6. |
Remove the rear door outside handle cable (A).
|
| 7. |
Install in the reverse order of removal.
|


 Rear Door Curtain Assembly Repair procedures
Replacement Put on gloves to protect your hands. • When prying with a flat-tip screwdriver or use a prying trim tool, wrap it with protective tape, and apply protective tape around the related parts, to prevent damage...
Other information:
Hyundai Sonata LF 2014-2019 Service Manual: Door Scuff Trim Repair procedures
Replacement [Front Door Scuff Trim] • Put on gloves to protect your hands. • When prying with a flat-tip screwdriver or use a prying trim tool, wrap it with protective tape, and apply protective tape around the related parts, to prevent damage...
Hyundai Sonata LF 2014-2019 Service Manual: Multifunction Switch
Specifications Specifications ItemsSpecificationsRated voltageDC 12VOperating temperature range-22 ~ +176°F (-30°C ~ +80°C)Rated loadWasherWasher : 6A (Motor load) Components and Components Location Component 1. Steering column2. Multifunction switch3...
Categories
- Manuals Home
- Hyundai Sonata Owners Manual
- Hyundai Sonata Service Manual
- Engine And Transmission Assembly
- Cylinder Head Cover Repair procedures
- Transmission Gear Oil General Information
- New on site
- Most important about car
