
Hyundai Sonata LF: Rear Parking Assist System / Parking Assist Sensor Repair procedures
Hyundai Sonata LF 2014-2019 Service Manual / Body Electrical System / Rear Parking Assist System / Parking Assist Sensor Repair procedures
| Removal |
| 1. |
Disconnect the negative (-) battery terminal. |
| 2. |
Remove the front/rear bumper cover.
(Refer to Body - "Front Bumper Cover")
(Refer to Body - "Rear Bumper Cover") |
| 3. |
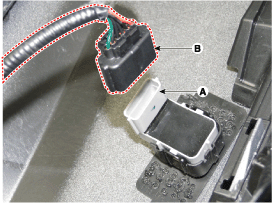
Disconnect the connector (B) from the parking assist sensor (A).
|
| 4. |
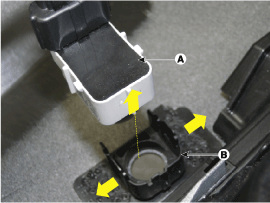
Pull out the front sensor (A) by opening the sensor holder (B) out.
|
| 5. |
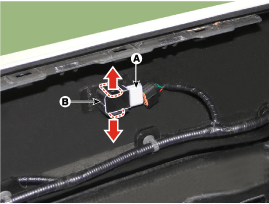
Pull out the rear sensor (A) by opening the sensor holder (B) out.
|
| Installation |
| 1. |
Install the rear ultra sensor after connecting the connector. |
| 2. |
Install the bumper cover. |
| 3. |
Connect the negative (-) battery terminal. |


Other information:
Hyundai Sonata LF 2014-2019 Service Manual: Electric Parking Brake (EPB) Repair procedures
EPB Release 1. Turn ignition switch OFF and disconnect the negative (-) battery cable. 2. Connect the GDS to the data link connector located underneath the dash panel. 3. Select and operate according to the instructions on the GDS screen. (1) Select vehicle name...
Hyundai Sonata LF 2014-2019 Service Manual: Components and Components Location
Component Location 1. Head lamp (Low)2. Head lamp (Low/High BI _Function)3. Head lamp (High) 4. Side marker lamp 5. Turn signal lamp6. Position lamp7. Daytime Running Light (DRL)8. Turn signal lamp (Door mirror)9. Room lamp10. Map lamp 1. Tail lamp2...
Categories
- Manuals Home
- Hyundai Sonata Owners Manual
- Hyundai Sonata Service Manual
- Transmission Gear Oil General Information
- Cylinder Head Cover Repair procedures
- Heating, Ventilation and Air Conditioning
- New on site
- Most important about car

Copyright В© 2026 www.hsonatalf.org