Hyundai Sonata LF: Engine Control System / Manifold Absolute Pressure Sensor (MAPS) Repair procedures
Hyundai Sonata LF 2014-2019 Service Manual / Engine Control / Fuel System / Engine Control System / Manifold Absolute Pressure Sensor (MAPS) Repair procedures
| Inspection |
| 1. |
Connect the GDS on the Data Link Connector (DLC). |
| 2. |
Measure the output voltage of the MAPS at idle and IG ON.
|
| Removal |
| 1. |
Turn the ignition switch OFF and disconnect the battery negative (-) cable. |
| 2. |
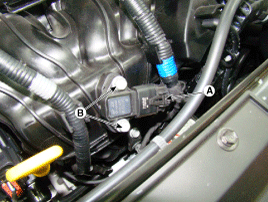
Disconnect the manifold absolute pressure sensor connector (A). |
| 3. |
Remove the installation bolt (B), and then remove the sensor from the surge tank.
|
| Installation |
|

|
| 1. |
Install in the reverse order of removal.
|

 Intake Air Temperature Sensor (IATS) Description and Operation
Description Intake Air Temperature Sensor (IATS) is included inside Manifold Absolute Pressure Sensor and detects the intake air temperature. To calculate precise air quantity, correction of the air temperature is needed because air density varies according to the temperature...
Other information:
Hyundai Sonata LF 2014-2019 Service Manual: Heater & A/C Control Unit (DATC) Repair procedures
Self Diagnosis 1. Self-diagnosis process. • When operating the self-diagnostics, the below fault (self-diagnostics code) will blink at 0.5 seconds interval on the temperature display settings (driver's side only) and the remaining symbols are OFF ...
Hyundai Sonata LF 2014-2019 Service Manual: Center Pillar Trim Components and Components Location
C..
Categories
- Manuals Home
- Hyundai Sonata Owners Manual
- Hyundai Sonata Service Manual
- Engine Control / Fuel System
- Cooling System
- DCT (Dual Clutch Transmission) System
- New on site
- Most important about car

Copyright © 2026 www.hsonatalf.org