Hyundai Sonata LF: Interior Trim / Center Pillar Trim Repair procedures
[Center Pillar Lower Trim]
| • |
Put on gloves to protect your hands. |
|
| • |
When prying with a flat-tip screwdriver or use a prying trim
tool, wrap it with protective tape, and apply protective tape around the
related parts, to prevent damage. |
| • |
Use a plastic panel removal tool to remove interior trim pieces to protect from marring the surface. |
| • |
Take care not to bend or scratch the trim and panels. |
|
| 1. |
Remove the front door scuff trim.
(Refer to Interior Trim - "Door Scuff Trim") |
| 2. |
Remove the rear door scuff trim.
(Refer to Interior Trim - "Door Scuff Trim") |
| 3. |
Slighty remove the front door body side weatherstrip. |
| 4. |
Slighty remove the rear door body side weatherstrip. |
| 5. |
Using a screwdriver or remover, remove the center pillar lower trim (A). 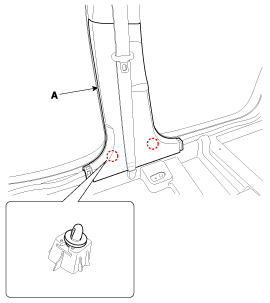
|
| 6. |
Install in the reverse order of removal.
| • |
Replace any damage clips. |
|
|
[Center Pillar Upper Trim]
| • |
Put on gloves to protect your hands. |
|
| • |
When prying with a flat-tip screwdriver, wrap it with
protective tape, and apply protective tape around the related parts, to
prevent damage. |
| • |
Use a plastic panel removal tool to remove interior trim pieces to protect from marring the surface. |
| • |
Take care not to bend or scratch the trim and panels. |
|
| 1. |
Remove the center pillar lower trim.
(Refer to Interior Trim - "Center Pillar Trim") |
| 2. |
Remove the front anchor seat belt.
(Refer to Restraint - "EFD (Emergency Fastening Device) System") |
| 3. |
Using a screwdriver or remover, remove the center pillar lower trim (A). 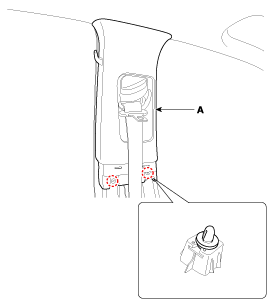
|
| 4. |
Install in the reverse order of removal.
| • |
Replace any damaged clips. |
|
|
Other information:
Description
The primary purpose of the SRSCM (Supplemental Restraints
System Control Module) is to discriminate between an event that warrants
restraint system deployment and an event that does not. The SRSCM must
decide whether to deploy the restraint system or not...
Removal
[For C-MDPS Type]
Must be backup the ECU data before exchanging the ECU. The backup data is stored by the VIN number.
Before exchanging the MDPS motor, must be confirm the last two digit of the constant value in motor barcord...



