Hyundai Sonata LF: Engine Control System / Engine Control Module (ECM) Repair procedures
| Removal |
When replacing the ECM, the vehicle equipped with immobilizer must be performed the procedure as below.
[In the case of installing used ECM]
[In the case of installing new ECM]
Then the ECM key register process is completed automatically.
|

| 1. |
Turn ignition switch OFF and disconnect the negative (-) battery cable. |
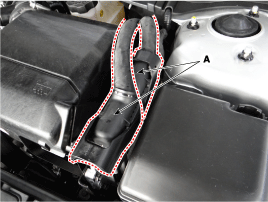
| 2. |
Disconnect the ECM Connector (A).
|
| 3. |
Remove the air cleaner assembly.
(Refer to Engine Mechanical System - "Air Cleaner") |
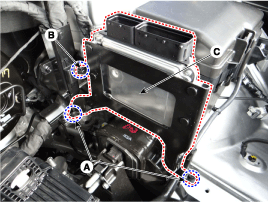
| 4. |
Remove the mounting bolts (A) and nut (B), and then remove the ECM (C).
|
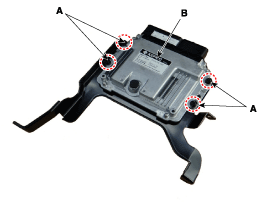
| 5. |
Remove the ECM (B) after removing 4 nuts (A) from the bracket.
|
| Installation |
When replacing the ECM, the vehicle equipped with immobilizer must be performed the procedure as below.
[In the case of installing used ECM]
[In the case of installing new ECM]
Then the ECM key register process is completed automatically.
|
| 1. |
Install in the reverse order of removal.
|
| ECM Problem Inspection Procedure |
| 1. |
TEST ECM GROUND CIRCUIT: Measure resistance between ECM and
chassis ground using the backside of ECM harness connector as ECM side
check point. If the problem is found, repair it.
|
| 2. |
TEST ECM CONNECTOR: Disconnect the ECM connector and visually
check the ground terminals on ECM side and harness side for bent pins
or poor contact pressure. If the problem is found, repair it. |
| 3. |
If problem is not found in Step 1 and 2, the ECM could be
faulty. If so, make sure there were no DTC's before swapping the ECM
with a new one, and then check the vehicle again. If DTC's were found,
examine this first before swapping ECM. |
| 4. |
RE-TEST THE ORIGINAL ECM: Install the original ECM (may be
broken) into a known-good vehicle and check the vehicle. If the problem
occurs again, replace the original ECM with a new one. If problem does
not occur, this is intermittent problem (Refer to “Intermittent
Problem Inspection Procedure” in Basic Inspection Procedure). |
 Engine Control Module (ECM) Schematic Diagrams
ECM Terminal And Input/Output signal ECM Terminal Function Connector [C500-A] Pin No.DescriptionConnected to1Injector (Cylinder #3) [High] control outputInjector (Cylinder #3)2Injector (Cylinder #4) [High] control outputInjector (Cylinder #4)3Injector (Cylinder #2) [Low] control outputInjector (Cylinder #2)4Electric Waste Gate Actuator (EWGA) DC Motor output (+)Electric Waste Gate Actuator (EWGA) 5Heated Oxygen Sensor (HO2S) [Bank 1/Sensor 1] heater control outputHeated Oxygen Sensor (HO2S) [Bank 1/Sensor 1]6-?7-8-?9Sensor ground Electric Waste Gate Actuator (EWGA) 10-?11-?12-13-?14Cooling fan relay [High] control outputCooling fan relay [High]15CVVT Oil Control Valve (OCV) [Bank 1/Exhaust] control outputCVVT Oil Control Valve (OCV) [Bank 1/Exhaust]16Injector (Cylinder #2) [High] control outputInjector (Cylinder #2)17Injector (Cylinder #1) [High] control outputInjector (Cylinder #1)18Injector (Cylinder #3) [Low] control outputInjector (Cylinder #3)19Electric Waste Gate Actuator (EWGA) DC Motor output (-) Electric Waste Gate Actuator (EWGA) 20Heated Oxygen Sensor (HO2S) [Bank 1/Sensor2] heater control outputHeated Oxygen Sensor (HO2S) [Bank 1/Sensor 2]21-?22-?23Engine Coolant Temperature Sensor (ECTS) signal inputEngine Coolant Temperature Sensor (ECTS)?24Sensor groundEngine Coolant Temperature Sensor (ECTS) 25-?26Fuel Tank Pressure Sensor (FTPS) signal inputFuel Tank Pressure Sensor (FTPS)27Fuel pump relay control output (NON-Smart key type)Fuel pump relayCanister Close Valve (CCV) control output (Smart key type)Canister Close Valve (CCV)28-?29-30-?31Ignition coil (Cylinder #3) control outputIgnition coil (Cylinder #3)32Ignition coil (Cylinder #1) control outputIgnition coil (Cylinder #1)33Injector (Cylinder #1) [Low] control outputInjector (Cylinder #1)34Fuel Pressure Control Valve (FPCV) [High] control outputFuel Pressure Control Valve (FPCV)35ETC motor [-] control outputETC motor36-?37Knock Sensor (KS) signal inputKnock Sensor (KS)38Sensor groundKnock Sensor (KS)39-40Brake Light switch signal inputBrake switch41-42-43-?44-?45CVVT Oil Control Valve (OCV) [Bank 1/Intake] control outputCVVT Oil Control Valve (OCV) [Bank 1/Intake]46Ignition coil (Cylinder #4) control outputIgnition coil (Cylinder #4)47Ignition coil (Cylinder #2) control outputIgnition coil (Cylinder #2)48Injector (Cylinder #4) [Low] control outputInjector (Cylinder #4)49Fuel Pressure Control Valve (FPCV) [Low] control outputFuel Pressure Control Valve (FPCV)50ETC motor [+] control outputETC motor51-?52Electric Waste Gate Actuator (EWGA) Feed beck signal Electric Waste Gate Actuator (EWGA) 53Brake Test switch signal inputBrake switch54-?55-56Electric load signal input [Defrost]Alternator57Alternator COM signal outputAlternator58Engine speed signal outputCluster59Cooling fan relay [Low] control outputCooling fan relay [Low] 60- Connector [C500-K] Pin No...
 ETC (Electronic Throttle Control) System Description and Operation
Description The Electronic Throttle Control (ETC) System consists of a throttle body with an integrated control motor and throttle position sensor (TPS)...
Other information:
Hyundai Sonata LF 2014-2019 Service Manual: CVVT Oil Control Valve (OCV) Description and Operation
Description Continuous Variable Valve Timing (CVVT) system advances or retards the valve timing of the intake and exhaust valve in accordance with the ECM control signal which is calculated by the engine speed and load. By controlling CVVT, the valve over-lap or under-lap occurs, which makes better fuel economy and reduces exhaust gases (NOx, HC) and improves engine performance through reduction of pumping loss, internal EGR effect, improvement of combustion stability, improvement of volumetric efficiency, and increase of expansion work...
Hyundai Sonata LF 2014-2019 Service Manual: Rear Seat Folding Lever Repair procedures
Replacement 1. Fold the rear seat back assembly (A) by pulling the folding lever in the direction of the arrow. 2. After loosening the mounting bolts, then remove the rear seat folding lever (A). 3. Install in the reverse order of removal...
Categories
- Manuals Home
- Hyundai Sonata Owners Manual
- Hyundai Sonata Service Manual
- Body Electrical System
- Engine Electrical System
- Brake System
- New on site
- Most important about car
