Hyundai Sonata LF: Interior Trim / Center Pillar Trim Repair procedures
| Replacement |
|

|

| 1. |
Remove the front door scuff trim.
(Refer to Interior Trim - "Door Scuff Trim") |
| 2. |
Remove the rear door scuff trim.
(Refer to Interior Trim - "Door Scuff Trim") |
| 3. |
Slighty remove the front door body side weatherstrip. |
| 4. |
Slighty remove the rear door body side weatherstrip. |
| 5. |
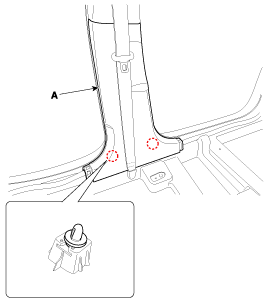
Using a screwdriver or remover, remove the center pillar lower trim (A).
|
| 6. |
Install in the reverse order of removal.
|

|
|
| 1. |
Remove the center pillar lower trim.
(Refer to Interior Trim - "Center Pillar Trim") |
| 2. |
Remove the front anchor seat belt.
(Refer to Restraint - "EFD (Emergency Fastening Device) System") |
| 3. |
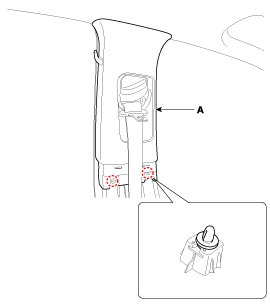
Using a screwdriver or remover, remove the center pillar lower trim (A).
|
| 4. |
Install in the reverse order of removal.
|


Other information:
Hyundai Sonata LF 2014-2019 Service Manual: Troubleshooting
Troubleshooting Ignition System SymptomSuspect AreaRemedyEngine will not start or is hard to start (Cranks OK)Ignition lock switchInspect ignition lock switch, or replace as requiredIgnition coilInspect ignition coil, or replace as requiredSpark plugsInspect spark plugs, or replace as requiredIgnition wiring disconnected or brokenRepair wiring, or replace as requiredRough idle or stallsIgnition wiringRepair wiring, or replace as requiredIgnition coilInspect ignition coil, or replace as requiredEngine hesitates/poor accelerationSpark plugs and spark plug cablesInspect spark plugs / cable, or replace as requiredIgnition wiringRepair wiring, or replace as requiredPoor mileageSpark plugs and spark plug cablesInspect spark plugs / cable, or replace as required Charging System SymptomSuspect AreaRemedyCharging warning indicator does not light with ignition switch "ON" and engine off...
Hyundai Sonata LF 2014-2019 Service Manual: Clutch Actuator Assembly Specifications
S..
Categories
- Manuals Home
- Hyundai Sonata Owners Manual
- Hyundai Sonata Service Manual
- Timing System
- Front Driveshaft Repair procedures
- General Information
- New on site
- Most important about car
