Hyundai Sonata LF: Engine Control System / Purge Control Solenoid Valve (PCSV) Repair procedures
| Inspection |
| 1. |
Turn the ignition switch OFF. |
| 2. |
Disconnect the PCSV connector. |
| 3. |
Measure resistance between the PCSV terminals 1 and 2. |
| 4. |
Check that the resistance is within the specification.
|
| Removal |
| 1. |
Turn the ignition switch OFF and disconnect the battery negative (-) cable. |
| 2. |
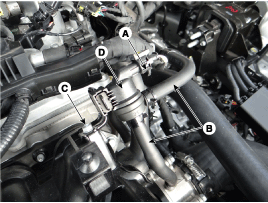
Disconnect the purge control solenoid valve connector (A). |
| 3. |
Disconnect the vapor hoses (B) from the purge control solenoid valve. |
| 4. |
Remove the installation bolt (C), and then remove the PCSV (D) from the engine.
|
| Installation |
|

|
| 1. |
Install in the reverse order of removal.
|

 CVVT Oil Control Valve (OCV) Description and Operation
Description Continuous Variable Valve Timing (CVVT) system advances or retards the valve timing of the intake and exhaust valve in accordance with the ECM control signal which is calculated by the engine speed and load...
Other information:
Hyundai Sonata LF 2014-2019 Service Manual: Advanced Smart Cruise Control (ASCC) Unit-Radar Description and Operation
Description The smart cruise control unit is installed on the front right side of the chassis.A radar sensor is embedded in the front section of the unit. This sensor detects vehicles and objects in front of the vehicle.The radar sensor can detect up to 64 objects ahead of a vehicle...
Hyundai Sonata LF 2014-2019 Service Manual: Rear Upper Arm Repair procedures
Replacement 1. Raise the vehicle, and make sure it is securely supported. 2. Remove the wheel cap (A). Be careful not to damage to the wheel cap (A) when removing the it. 3. Remove the front wheel and tire (A) from front hub...
Categories
- Manuals Home
- Hyundai Sonata Owners Manual
- Hyundai Sonata Service Manual
- Driveshaft and axle
- Front Driveshaft Repair procedures
- Body Electrical System
- New on site
- Most important about car
