Hyundai Sonata LF: Crash Pad / Main Crash Pad Assembly Repair procedures
Hyundai Sonata LF 2014-2019 Service Manual / Body (Interior and Exterior) / Crash Pad / Main Crash Pad Assembly Repair procedures
| Replacement |
|

|

| 1. |
Disconnect the negative (-) battery terminal. |
| 2. |
Remove the front pillar trim.
(Refer to Interior Trim - "Front Pillar Trim") |
| 3. |
Remove the cowl side trim.
(Refer to Interior Trim - "Cowl Side Trim") |
| 4. |
Remove the AVN head unit.
(Refer to Body Electrical System - "AVN Head Unit") |
| 5. |
Remove the instrument cluster.
(Refer to Body Electrical System - "Instrument Cluster") |
| 6. |
Remove the crash pad side garnish assembly.
(Refer to Crash Pad - "Crash pad side garnish assembly [RH]") |
| 7. |
Down the steering column after loosening the mounting bolts.
(Refer to Steering System - "Steering Column and Shaft") |
| 8. |
Remove the multifunction switch assembly.
(Refer to Body Electrical System - "Multifunction Switch") |
| 9. |
Remove the knee airbag (KAB) module.
(Refer to Restraint - "Knee Airbag (KAB) Module") |
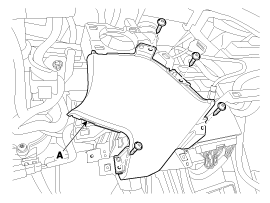
| 10. |
Remove the indoor antenna.
(Refer to Body Electrical System - "Smart Key Unit") |
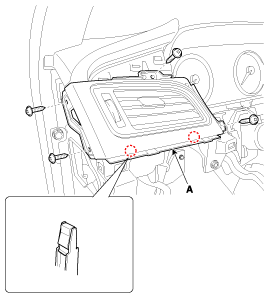
| 11. |
After loosening the mounting screws, then remove the crash pad upper panel [LH] (A).
|
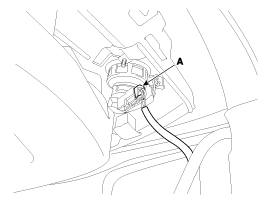
| 12. |
Disconnect the photo sensor connector (A).
|
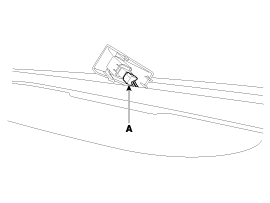
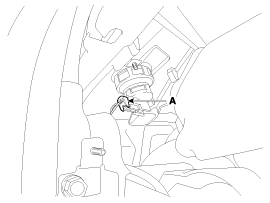
| 13. |
Loosen the mounting bolts (A).
|
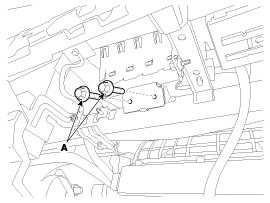
| 14. |
Disconnect the passenger's airbag connectors (B).
|
| 15. |
After loosen the mounting screws, remove the crash pad center lower cover (A).
[LH]
[RH]
|
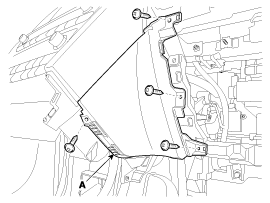
| 16. |
After loosening the mounting bolts and nuts, then remove the main crash pad assembly (A).
|

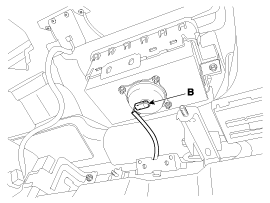
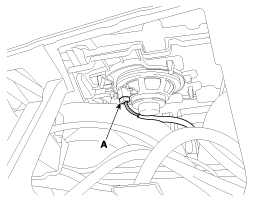
| 17. |
Right before removing the main crash pad, slightly lift the
main crash pad and remove the twitter speaker connector (A) and mounting
clip located at the end of both side.
[LH]
[RH]
[Center]
|
| 18. |
Install in the reverse order of removal.
|


Other information:
Hyundai Sonata LF 2014-2019 Service Manual: Oil Cooler Repair procedures
Removal 1. Loosen the drain plug and drain the coolant. Open the radiator cap to make rapid draining. (Refer to Cooling System - "Coolant") 2. Disconnect the oil cooler hose (A). 3. Remove the oil filter (A) with the SST (09263-2E000, the oil filter wrench)...
Hyundai Sonata LF 2014-2019 Service Manual: Trunk Lid
Repair procedures Adjustment 1. After loosening the trunk lid hinge (A) mounting bolt, adjust the trunk lid by moving it up or down, or right or left. 2. Adjust the trunk lid height by turning the trunk lid overslam bumpers (B). 3. After loosening the trunk lid striker (C) mounting bolts, adjust the trunk lid striker by moving it up or down, or right or left...
Categories
- Manuals Home
- Hyundai Sonata Owners Manual
- Hyundai Sonata Service Manual
- Transmission Gear Oil Repair procedures
- Engine Control System
- Brake System
- New on site
- Most important about car

Copyright © 2026 www.hsonatalf.org