Hyundai Sonata LF: Seat Belt Pretensioner / Seat Belt Pretensioner (BPT) Repair procedures
| Removal |
| 1. |
Disconnect the battery negative cable, and wait for at least three minutes before beginning work. |
| 2. |
Remove the door scuff trim.
(Refer to Body - "Interior Trim") |
| 3. |
Remove the center pillar trim.
(Refer to Body - "Interior Trim") |
| 4. |
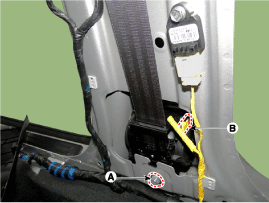
Loosen the seat belt pretensioner mounting bolts (A) and remove the seat belt pretensioner. |
| 5. |
Disconnect the seat belt pretensioner connector (B).
|
| Installation |
| 1. |
Remove the ignition key from the vehicle. |
| 2. |
Disconnect the battery negative cable and wait for at least three minutes. |
| 3. |
Install the seat belt pretensioner with bolts (A). |
| 4. |
Connect the seat belt pretensioner connector (B).
|
| 5. |
Install the center pillar trim.
(Refer to Body - "Interior Trim") |
| 6. |
Install the door scuff trim.
(Refer to Body - "Interior Trim") |
| 7. |
Insert the seat belt to the anchor pretensioner.
|

| 8. |
Reconnect the battery negative cable. |
| 9. |
After installing the seat belt pretensioner, confirm proper system operation:
|

 Emergency Fastening Device (EFD) Description and Operation
Description The Emergency Fastening Device (EFD) operates at the same time with the Seat Belt Pretensioner when it satisifies the deployment condition after a collision...
Other information:
Hyundai Sonata LF 2014-2019 Service Manual: Repair procedures
Adjustment 1. After loosening the trunk lid hinge (A) mounting bolt, adjust the trunk lid by moving it up or down, or right or left. 2. Adjust the trunk lid height by turning the trunk lid overslam bumpers (B). 3. After loosening the trunk lid striker (C) mounting bolts, adjust the trunk lid striker by moving it up or down, or right or left...
Hyundai Sonata LF 2014-2019 Service Manual: Heated Steering wheel Repair procedures
Inpection 1. Measure a resistance of NTC and Heated pad. A. NTC resistance(Black / Yellow, Black) - 10.0 k? ± 10% (25°C) B. Heated pad resistance (Yellow, Black) - 1.6 ~ 2.0 ? ± 10% 2. Measure a temperature. A. The temperature of wheel surface grip must rise from -20°C to 20°C within 6 minute B...
Categories
- Manuals Home
- Hyundai Sonata Owners Manual
- Hyundai Sonata Service Manual
- Timing System
- Engine Electrical System
- Engine And Transmission Assembly
- New on site
- Most important about car